Musta ekraani probleem Windows 10-s ilmneb tavaliselt pärast täiendamist või kui automaatne Windows Update installib teie süsteemi värskendused. Kuna see must ekraan on tõenäoliselt riistvaraprobleem (GPU), peame selle diagnoosimiseks ja parandamiseks hindama ja seadistama mitmesuguseid seadeid.

Tänapäeval on personaalarvutid üha enam arenenud, kuna nende jaoks on mitme graafikakaardi kasutamine raske. Niisiis, kui teil on mõni muu graafikakaart kui Inteli sisseehitatud graafikakontroller , oleks teil tõenäoliselt see alglaadimine musta ekraaniga seotud probleem. Mõnikord võtab Windows seda nii, nagu oleks süsteemi külge kinnitatud kaks monitori. Niisiis, Windows laadib väljundsignaali mustale ekraanile.
Enne kui asume ulatuslikesse tõrkeotsingutesse; peame kontrollima mõnda põhiseadet. Kui kasutate mitut kuvarit, ühendage lahti / ühendage uuesti ja testige esmase ekraaniga. Kui see probleemi lahendab; sa oled õnnelik. Kui ei, siis toimige järgmiselt.
1. meetod: kinnitage see pimesi
Selle meetodi eesmärk on probleemi lahendamine pimesi, kuna mustal ekraanil ei näe midagi.
- Kui Windows jääb musta ekraani külge kinni, oodake, kuni ekraanile ilmub valge hiirekursor . Selle olemasolu saate kontrollida hiirematti liigutades.
- Kui kursor on ekraanile ilmunud, vajutage klaviatuuri tühikuklahvi ja vajutage klaviatuuril üks kord klahvi Ctrl . Sisestage sisselogimisparool või PIN-kood pimesi (te ei näe seda mustal ekraanil) . See logiks Windowsi sisse teie volituste abil.
Kui te ei näe pärast oma kontole sisselogimist töölauda ja olete mustal ekraanil kinni, siis vajutage klaviatuuril Win + P + nooleklahvi (kaks korda) ja sisestage üksikasjad uuesti.
2. meetod: toite tsükkel
Kui see on kasutaja eemaldatava akuga sülearvuti;
- Võtke aku välja.
- Eemaldage toiteadapter vooluvõrgust.

- Vajutage ja hoidke toitenuppu 10 sekundit all
- Vabastage toitenupp.
- Ühendage laadija tagasi ja proovige see sisse lülitada.

Testige ja vaadake, kas probleem on lahendatud; kui ei, siis jätkake 4. meetodiga
3. meetod: lülitage kiire käivitamine välja
Windows 10 vabastatakse funktsiooniga Fast Startup. Nagu nimigi ütleb, võimaldab see operatsioonisüsteemi kiiret käivitamist, nii et saate oma tööd jätkata või kiiresti mängida.
MÄRKUS . Kiire käivitamise funktsioon töötab ainult siis, kui sooritate seiskamise ja seejärel süsteemi sisselülitamise , taaskäivitamisel see ei kehti .
Kiire käivitamise võimaluse väljalülitamine; järgige neid sammeKäivitage oma Windows 10 installimeedia abil. Võimalik, et peate bios-ist alglaadimise järjekorda muutma.
Vaadake: kuidas käivitatavat Windows 10 meediumit luua
- Klõpsake allosas nuppu Paranda arvuti
- Klõpsake valikul Veaotsing
- Klõpsake valikul Täpsemad valikud
Märkus. Kui see meetod ei toimi, proovige klõpsata nupul „Tagasi eelmiste versioonide juurde” ja järgige ekraanil kuvatavaid juhiseid.
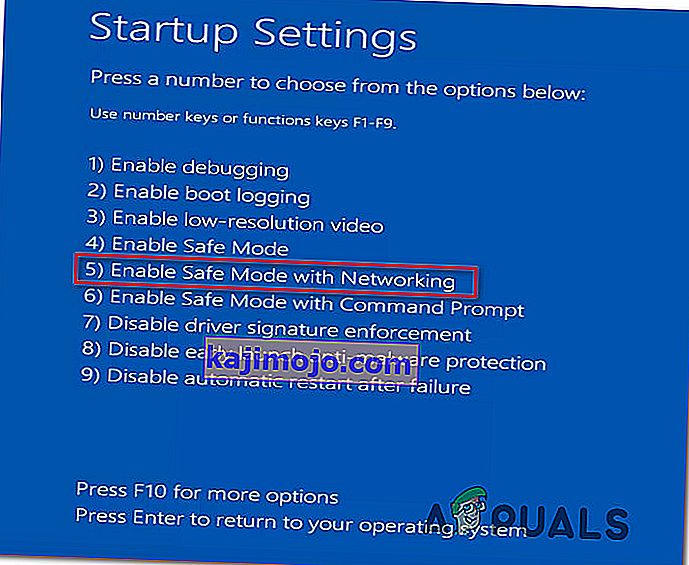
- Klõpsake käsku Startup Settings
- Klõpsake käsku Taaskäivita
- Valige turvarežiim võrguühendusega
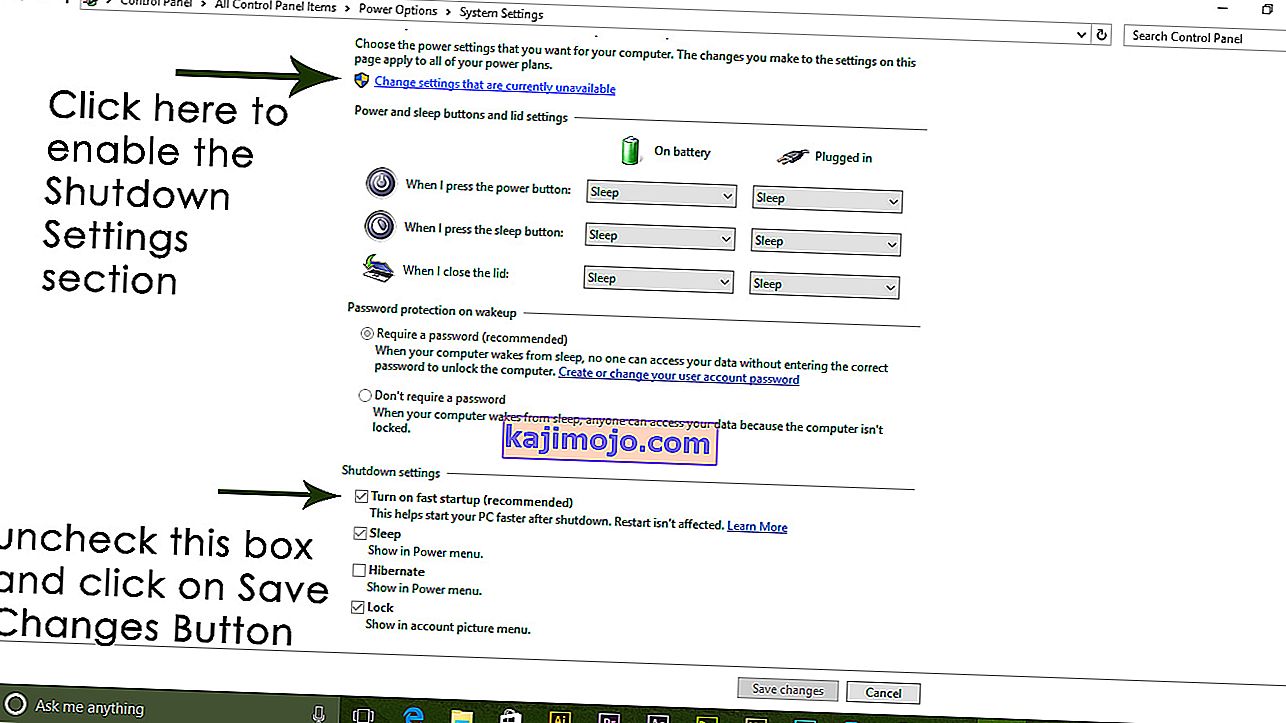
- Kui arvuti hakkab minema juhtpaneelile ;
- Valige toitesuvandid ; Valige vasakul asuv valik Valige, mida toitenupud teevad .


Siin kerige alla ja leidke valik Kiire käivitamine ning tühjendage see.
4. meetod: desinstallige ekraaniadapter
Musta ekraani kuvamisel tehke järgmist.
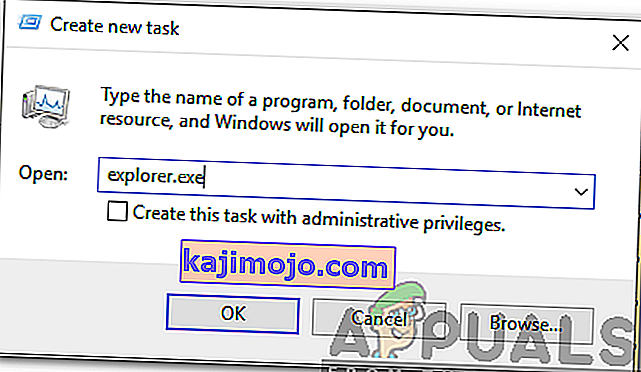
- Hoidke klahve CTRL + ALT + DEL koos, et näha, kas ülesannete haldur ilmub. Kui see juhtub, klõpsake nuppu Fail -> Uus -> ja tippige explorer.exe
- Kui see avab Exploreri akna; logige sisse ja desinstallige viirusetõrjetarkvara / graafikakaart ning installige seejärel uuesti.
Märkus. Võite ka viirusetõrje desinstallimise asemel ajutiselt keelata.
- Graafika / ekraaniadapteri desinstallimiseks; kui CTRL + ALT + DEL on edukas ja näete uurija akent, hoidke Win-klahvi all ja vajutage R
- Sisestage hdwwiz.cpl ja klõpsake nuppu OK
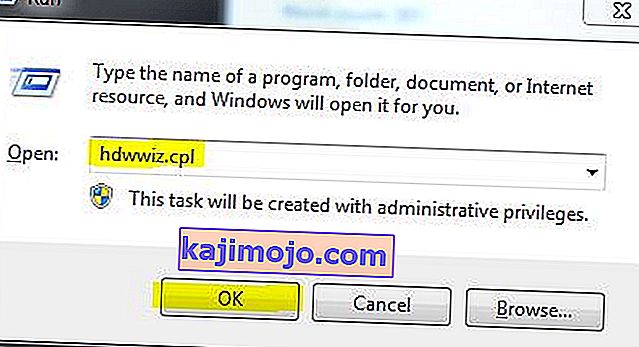
- Märkige üles oma ekraaniadapteri nimi;
- Laiendage Display Adapters -> valige Uninstall


Pärast selle desinstallimist minge uusima draiveri allalaadimiseks tootja saidile. Taaskäivitage & TEST
5. meetod: taastage oma süsteemi tehaseseaded
See meetod kustutab kõik teie andmed ja installib / installib teie arvutiga kaasas olnud algse operatsioonisüsteemi. Kuna seal on korruptsioon; ja kui andmed pole olulised, saame need taastada tehaseseadetele ja seejärel installida Windowsi puhas versioon. Pärast seda ei pruugi täiendamise võimalust enam olla.
Tehase taastamise juhised leiate oma süsteemi kasutusjuhendist.
6. meetod: taaskäivitage arvuti lihtsalt
Mõned Windows 10 kasutajad, kes on minevikus musta ekraani probleemi all kannatanud, teatasid, et arvuti lihtsalt toitenupu abil välja lülitamine ja seejärel uuesti varundamine tegi trikki ja vabanes nende jaoks probleemist. Nii veider kui see ka ei tundu, tasub see lahendus kindlasti kaadrit anda.
7. meetod: värskendage oma GPU draivereid nende uusimatele versioonidele
Windows 10 is a big step up from the previous versions of Windows, which is why all GPU manufacturers had to create entirely new drivers designed specifically for the new Operating System. Not having the updated Windows 10-compatible drivers on your computer is another thing that can cause your computer to be affected by the black screen issue. If outdated drivers are behind the black screen problem in your case, all you need to do is go to the official website of your computer manufacturer or your GPU’s manufacturer and download the latest drivers for your GPU (they should be available in both locations). Make sure that the drivers you download are specifically designed for Windows 10 to ensure the success of this solution.
Method 8: Change your laptop’s plugged in brightness to anything but 100%
On laptops that had high-end graphics cards and were updated to Windows 8, the black screen issue often presents itself when they are plugged into an AC power outlet. If that is the case, simply opening the Start Menu, searching for Advanced power settings, opening Advanced power settings and changing your laptop’s screen brightness when plugged into anything except for 100% (even 99% will do) will get rid of the black screen problem.
Method 9: If you have two graphics cards, disable the onboard one
A decent fix for the black screen issue for people whose computers have tow graphics cards – the onboard graphics card that came with the computer and the graphics card that they have added to it (such as an Nvidia or AMD graphic card) – is to simply disable the onboard graphics card. Apparently, having two graphics cards on a Windows 10 computer can result in a clash that consequently gives birth to the black screen issue. If that is the case, simply going into Device Manager, expanding the Display adapters section, right-clicking on the onboard graphics card and clicking on Disable should fix the issue.
If you do not see your onboard graphics card in the Display adapters section, click on View in the top left of the Device Manager dialog and click on Show hidden devices. This will make your onboard graphics card (or, in some cases, cards) visible, and you can then right-click on it and click on Disable.
Method 10: Refresh your computer
The infamous black screen issue on Windows 10 can also be fixed by simply refreshing your computer. Refreshing your computer has almost entirely the same effect as resetting it to factory settings, with the exception of the fact that a refresh only deletes installed programs and applications and keeps your personal data whereas a reset gets rid of everything on your computer. To refresh a Windows 10 computer, you need to:
- Open the Start Menu.
- Click on Settings.
- Out of the array of different options provided, click on Update & Security.
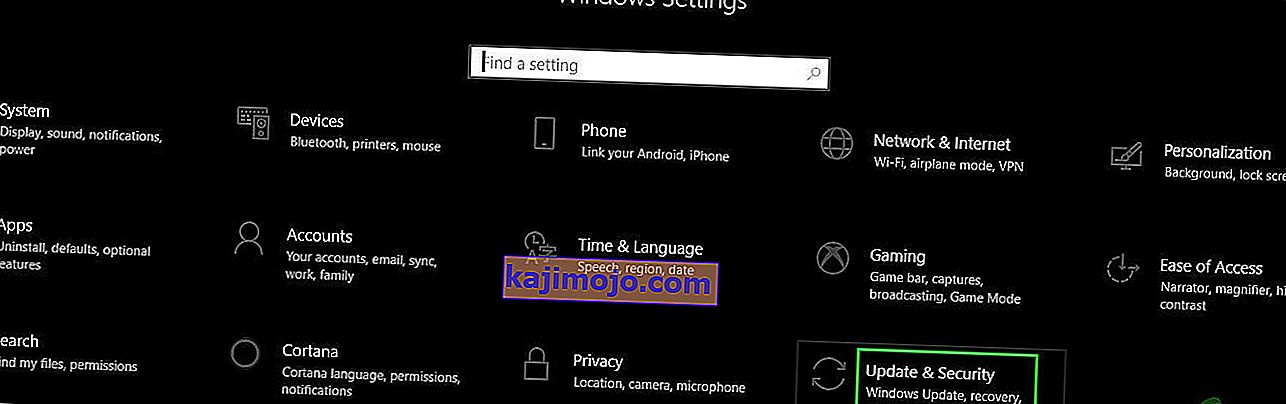
- Click on Recovery in the left pane.
- In the right pane, click on the Get started button under the Reset this PC
- When provided with a choice to either keep your files or remove everything, click on Keep my files.

Method 11: Correcting User Shell
In some cases, the User shell might be preventing the user from being able to boot safely into their computer. In certain situations, the user shell configuration inside the registry might get corrupted due to which this black screen issue can occur. Therefore, in this step, we will be correcting this user shell entry. In order to do that, follow the steps below.
- Boot your computer and wait for the black screen to appear.
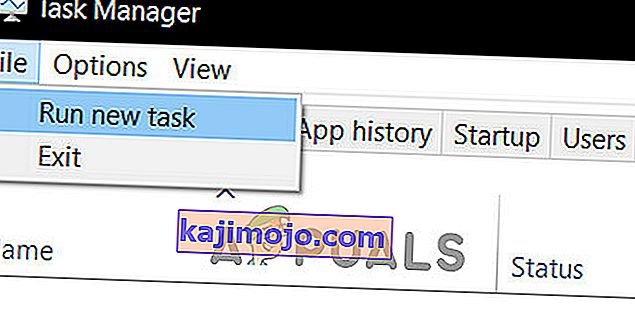
- Press “Ctrl” + “Alt” + “Del” and select the “Task Manager” option.
- Click on the “File” option on the top left of the task manager and select “Run New Task” from the list.
- Type in “regedit” and press “Enter” to open it.
Computer\HKEY_LOCAL_MACHINE\SOFTWARE\Microsoft\Windows NT\CurrentVersion\Winlogon
- Double click on the “Shell” entry on the right pane.
- Type in “Explorer.exe” in the Value data field and save your changes.
- Press “Ctrl” + “Alt” + “Del” again and click on the “Power Options” icon on the lower right side.

- Select “Restart” from the menu and wait for your computer to be restarted.
- Check to see if the issue persists after restarting the computer.


Method 12: Stopping Service
There is a specific service that prevents the computer from being able to function properly in some cases and stopping it can prevent the black screen issue from occurring. Therefore, in this step, we will be stopping this service. For that:
- Press “Ctrl” + “Alt” + “Del” and select the “Task Manager” option.
- Click on the “File” option on the top left of the task manager and select “Run New Task” from the list.
- Type in “services.msc” and press “Enter” to open it.
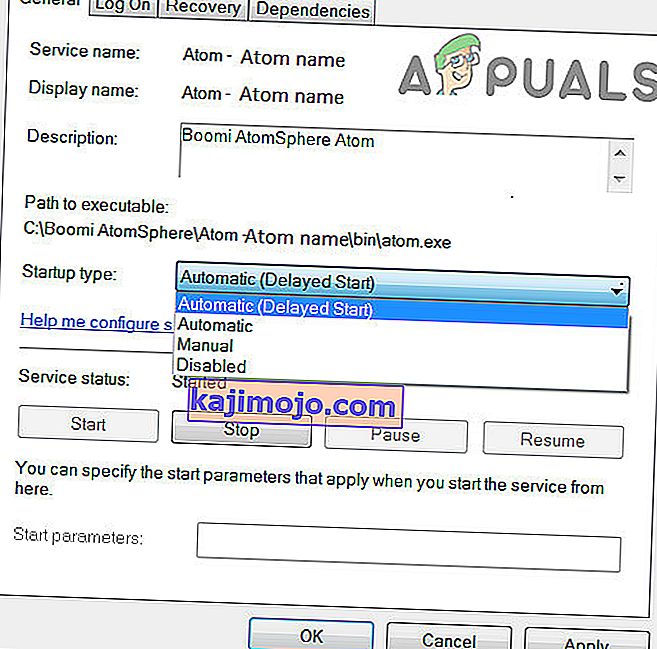
- Scroll through this list and look for the “RunOnce32.exe” or the “RunOnce.exe” entry. Also, do this same process for the “App Readiness” Service.
- Right-click on it and select “Stop”.
- Double click on it and change its startup type to “Disabled”.
- Wait for the service to be stopped completely and restart your computer.
- Check to see if the issue persists after stopping it completely.

Method 13: Renaming Files
In certain cases, the files in some Windows’ folders might have gotten corrupted due to which this black screen issue is being triggered. Therefore, in this step, we will be renaming these files and then check to see if the issue still persists.
- Press “Ctrl” + “Alt” + “Del” on the black screen.
- Click on the “Task Manager” option and then select “File”.
- Select the “Run New Task” option and then type in “cmd”.
- Type in the following command one by one for each file to rename it.
rename “(File Path) (File Name)” “(New Name)”
- Rename the following files to anything except their original names.
C:\ProgramData\Microsoft\Windows\AppRepository\StateRepository-Deployment C:\ProgramData\Microsoft\Windows\AppRepository\StateRepository-Deployment C:\ProgramData\Microsoft\Windows\AppRepository\StateRepository-Deployment C:\ProgramData\Microsoft\Windows\AppRepository\StateRepository-Machine C:\ProgramData\Microsoft\Windows\AppRepository\StateRepository-Machine C:\ProgramData\Microsoft\Windows\AppRepository\StateRepository-Machine
- Check to see if the issue persists after making these changes.
- If it still does, try the following code to just fix it.
cd "ProgramData\Microsoft\Windows\AppRepository" ren "StateRepository-Deployment.srd" "StateRepository-Deployment-Corrupted.srd" ren "StateRepository-Deployment.srd-shm" "StateRepository-Deployment-Corrupted.srd-shm" ren "StateRepository-Deployment.srd-wal" "StateRepository-Deployment-Corrupted.srd-wal" ren "StateRepository-Machine.srd" "StateRepository-Machine-Corrupted.srd" ren "StateRepository-Machine.srd-shm" "StateRepository-Machine-Corrupted.srd-shm" ren "StateRepository-Machine.srd-wal" "StateRepository-Machine-Corrupted.srd-wal"
- Check to see if the issue persists.
Method 14: Replacing Profile Cache
It is possible the Profile cache for your current user account has either gone missing from some locations or it has been corrupted in certain locations due to which this issue is being triggered. Therefore, in this step, we will be replacing this profile cache after copying it from a location. For that:
- Create a new user account before doing so and log into that.
- Restart your computer in safe mode.
- Log in to your new profile.
- Navigate to the following location and copy the folder named “caches”.
C:\Users\{working-user-profile-name}\AppData\Local\Microsoft\Windows\Caches - Paste this folder in the following location.
C:\Users\{broken-user-profile-name}\AppData\Local\Microsoft\Windows\Caches. - Check to see if the issue persists.
Follow the onscreen instructions and dialogs, and once you are done, your computer will have been refreshed and the black screen issue will be no more.
You can further try to:
- Boot your computer in safe mode and check if the issue persists over there. This will help you to isolate these issues from a specific app that is causing it.
- Press “Windows” + “P” to switch displays that might fix this.
- Update your Bios
- Disconnect the Second monitor
- Try to use an HDMI cable for connection instead of a DVI or VGA one.
- When in the black screen, press the “Windows’ + “Ctrl” + “Shift” + “B” keys to refresh the Graphics Driver.
- You can also try to perform a Startup Repair.
- Try to create a new user account using the last methods listed in this article.
- Tehke SFC- ja DISM-skannimine.