Tõrge „ Töötlemata win32-erand ilmnes rakenduses * application_name * ” ilmneb tavaliselt siis, kui kasutaja proovib käivitada Visual Studiosse ehitatud rakenduse. Enamik selle vea teatatud juhtumeid on seotud Uplay, Internet Exploreri ja mitme Legacy mänguga, mis olid algselt ehitatud Windowsi vanemate versioonide jaoks.

Märkus . Siit saate teada, kuidas parandada Visual C ++-ga seotud käitamisraamatukogu.
Mis põhjustab Windowsi tõrke „Teie rakenduses on käsitlemata erand”?
Sellel probleemil on mitu lihtsat põhjust ja probleemi saab tõhusalt lahendada, kui suudate oma stsenaariumi ära tunda lihtsalt õige põhjuse tuvastamise põhjal. Vaadake allolevat loendit:
- Teie viirusetõrje võib olla süüdlane - teadaolevalt on selle probleemi põhjustanud mõned viirusetõrjevahendid, näiteks Panda Antivirus, seega veenduge, et need asendaksite.
- Teatud programmid või pahavara võivad töötada - kui teie arvutis töötab installitud programm või pahavara, võiksite sellest lahti saada. Käivitage puhas alglaadimine, et näha, kas see on õige põhjus.
- Microsofti .NET Framework-i install on rikutud - kui selle põhifailid on rikutud, võite proovida selle installimist parandada, installida uuema versiooni või teha SFC-skannimist.
- Skripti silumine on registri kaudu lubatud - nagu selgub, võib konkreetne registrivõtm selle probleemi ilmnemisele kaasa aidata. Selle hooldamiseks peate keelama skriptide silumise registrivõtmete kaudu.
- Juurdepääsurikkumine Msvcr92.dll-s - ka lähtekoha puhvri ületamine või vale lõplik bait on selle probleemi potentsiaalsed põhjused. Nende lahendamiseks peate installima kõik ootel olevad Windowsi värskendused.
- Ubisofti käivitaja registrivõtme kustutamine - kui näete seda viga Uplay.exe käivitamisel, on see tingitud Ubisofti mängude käivitaja veast. Selle probleemi saab lahendada ka registri kaudu, kustutades sellele käivitajale kuuluva väärtuse.
- Süsteemifailide rikkumine - selle probleemi võib tekitada ka süsteemifailide vastuolulisus. Kerge korruptsiooni saab lahendada lihtsate DISM- ja SFC-skannimiste abil. Raskemates olukordades peaks probleemi lahendamisel aitama puhas installimine või parandamine.
1. lahendus: installige kõik ootel Windows Update
Üks levinumaid põhjuseid, mis põhjustavad tõrke „ Töötlemata win32 erand tekkis ”, on rakendus, mis ehitati x64 platvormi jaoks MSVCR90.DLL abil, mis kutsub üles funktsiooni strncpy.
Sel juhul põhjustab Msvcr92.DLL- failis käivitatud juurdepääsurikkumine tõenäoliselt rakenduse strncpy funktsioonis reageerimise. Lähtepuhvri ületamine või vale lõplik bait on selle probleemi kõige tõenäolisemad põhjused.
Õnneks on Microsoft juba sellest probleemist teadlik ja on selle probleemi jaoks välja andnud käigultparanduse, mis selle automaatselt lahendab. Selle kasutamiseks on vaja ainult värskendada oma OS-i versioon uusimale saadaolevale versioonile.
Märkus. See käigultparandus lükati Visual Studio 2008 redaktsiooni, mida Windows automaatselt värskendab, seega on alltoodud toimingud universaalsed ja peaksid töötama sõltumata teie OS-i versioonist.
Siin on kiire juhend Windowsi järgu värskendamiseks uusimale versioonile, et installida Visual Studio 2008 kiirparandus ja probleem lahendada:
- Press Windows klahv + R avada Run dialoogiboks. Järgmisena tippige „ms-settings: windowsupdate” ja vajutage sisestusklahvi, et avada rakenduse Seaded Windowsi värskenduste vahekaart .
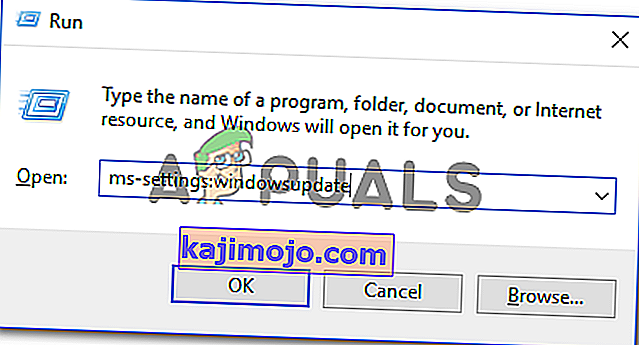
Märkus. Juhul, kui teil tekib see probleem Windows 7 või Windows 8.1 puhul. kasutage selle asemel käsku 'wuapp' .
- Kui teil on õnnestunud Windows Update'i ekraanile jõuda, klõpsake kõigepealt nupul Otsi värskendusi . Seejärel hakake järgima ekraanil kuvatavaid viipasid, et lõpetada iga praegu installimist ootava Windows Update'i installimine.

Märkus. Pidage meeles, et ülitähtis on installida kõik värskendused, mitte ainult kriitilised. Kuna käigultparandus on kaasatud Visual Stuudio redaktsiooni, võite vastava värskenduse leida valikuliselt, seega installige need kindlasti.
- Kui teil palutakse enne kõigi saadaolevate värskenduste installimist võimaluse taaskäivitada, tehke seda. Kuid pärast järgmise käivitamise lõppu naaske sellele samale ekraanile, et ülejäänud värskenduste installimine lõpule viia.
- Kui kõik ootel värskendused on installitud, taaskäivitage arvuti veel kord ja korrake seejärel toimingut, mis varem tõrketeate põhjustas, et näha, kas probleem on lahendatud.


Kui näete endiselt tõrket " Töötlemata win32 erand ilmnes ", liikuge järgmisele alltoodud meetodile.
Lahendus 2. Asendage viirusetõrje
Tasuta viirusetõrjevahendid võivad olla üsna kasulikud ja nad saavad oma tööd kaitsta teie arvutit, kuid mõnikord ei saa nad lihtsalt teie arvuti muude asjadega hästi hakkama. Kaaluge viirusetõrje väljavahetamist, kui see põhjustab sisselülitatud probleemi!
- Klõpsake menüüd Start ja avage seda otsides juhtpaneel . Teise võimalusena võite klõpsata seadete avamiseks hammasrattaikoonil, kui kasutate Windows 10.
- Juhtpaneelil valige paremas ülanurgas Kuva nimega - kategooria ja klõpsake jaotises Programmid Programmi desinstallimine

- Kui kasutate rakenduses Seaded, klõpsates Apps kohe loendi avamiseks kõik installitud programmid arvutis.
- Leidke oma viirusetõrjetööriist juhtpaneelilt või sätetest ja klõpsake nuppu Desinstalli .
- Selle desinstallimisviisard peaks avanema, nii et järgige desinstallimiseks juhiseid.

- Kui desinstalliprotsess on protsessi lõpetanud, klõpsake nuppu Lõpeta ja taaskäivitage arvuti, et näha, kas tõrkeid ikka ilmub. Valige kindlasti parem viirusetõrjevõimalus .
Lahendus 3. Käivitusregistri väärtuse kustutamine (kui see on asjakohane)
Kui proovite käivitada Uplay.exe või mõnda muud Ubisoftile kuuluvat rakendust, ilmneb tõrge „Töötlemata win32 erand ilmnes ”, on see tõenäoliselt tingitud nende Ubisofti mängude käivitaja veast.
Nagu selgub, näib see olevat Windows 10-s laialt levinud probleem, eriti nende kasutajate seas, kellele on korraga installitud nii Steam kui ka Uplay.
Mitu mõjutatud kasutajat, kelle probleem on selle probleemi lahendamine, on õnnestunud see parandada, kasutades registriredaktorit, et leida käivitusprogrammile kuuluv stringi registriväärtus ja see kustutada. See kõrvaldab väidetavalt konflikti, võimaldades mõlemal rakendusel sama masina all korralikult töötada.
Siin on kiire juhend Uplay käivitajaga seotud registriväärtuse kustutamiseks:
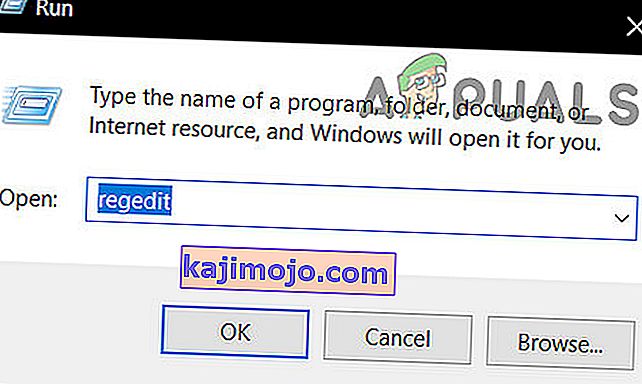
- Press Windows klahv + R avada Run dialoogiboks. Tippige tekstiväljale „regedit” ja vajutage registriredaktori avamiseks Enter . Kui teil palutakse UAC (User Account Control) viip, sisestage administraatoriõiguste andmiseks Jah .
- Kui olete registriredaktoris sees , liikuge järgmisse asukohta navigeerimiseks akna vasakus servas:
Arvuti \ HKEY_LOCAL_MACHINE \ SOFTWARE \ WOW6432Node \ Ubisoft
Märkus. Võite navigeerida seal käsitsi või kleepida asukoha otse ülaosas asuvale navigeerimisribale ja vajutada sisestusklahvi, et sinna kohe jõuda.
- Kui teil õnnestub õigesse asukohta maanduda, liikuge ekraani parempoolsesse ossa, paremklõpsake käivitusprogrammil Käivitaja ja valige Kustuta, et sellest lahti saada.

Märkus. Juhul, kui saate võtme kustutada, tehke järgmist, kuidas registrivõtmed omandada.
Note: After you delete it, the launcher will be forced to create a new Launcher string value with fresh data, which should resolve the issue.
- Once the key has been deleted, close Registry Editor and restart your computer.
- At the next computer startup, repeat the action that was previously causing the “An unhandled win32 exception occurred‘ error and see if the problem is resolved.


In case the same issue is persisting, move down to the next potential fix below.
Solution 4: Reset Internet Explorer (if applicable)
Another potential instance with the potential of creating this issue is a series of corrupted Internet Explorer (IE). If you’re encountering the “An unhandled win32 exception occurred in iexplore.exe’ error chances are it appears after a failing script.
To fix this issue, you should reset your Internet Explorer settings via the Internet Options menu. This operation was confirmed to be successful by a lot of users that were dealing with this error.
Here’s a quick guide on resetting Internet Explorer in order to resolve the “An unhandled win32 exception occurred‘ error:
- Ensure that Internet Explorer, Edge or any other associated instance is turned off and no background process is running.
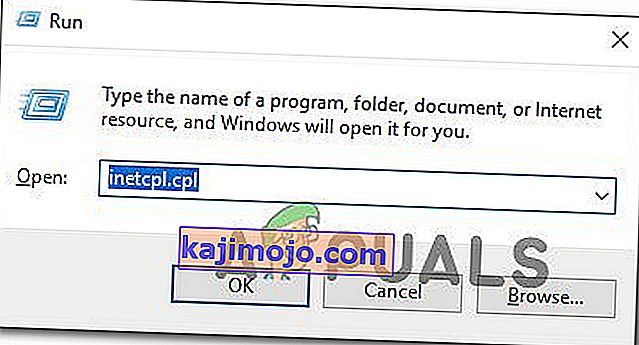
- Press Windows key + R to open up a Run dialog box. Inside the text box, type ‘inetcpl.cpl’ and press Enter to open up the Internet Options menu.
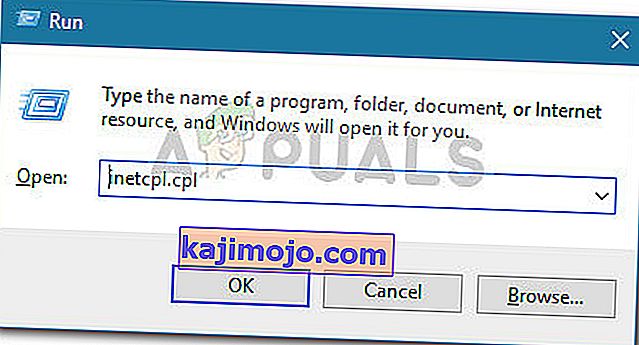
Note: If you are prompted by the UAC (User Account Control), click Yes to grant administrative privileges.
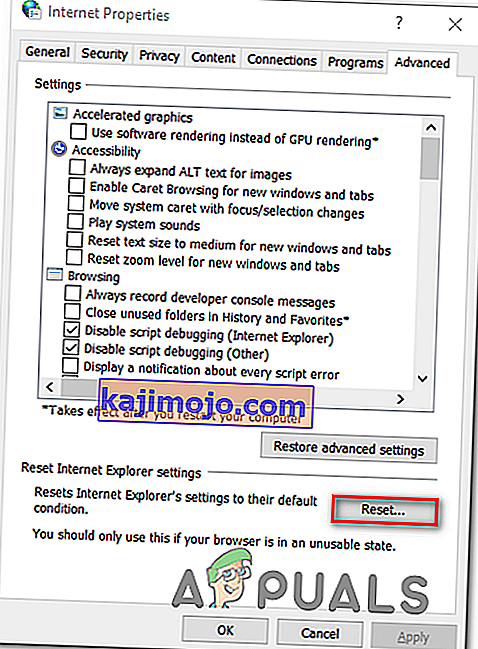
- After you manage to get inside the Internet Properties screen, select the Advanced tab from the horizontal menu at the top. Next, go to the Reset Internet Explorersettings and click on the Reset button.
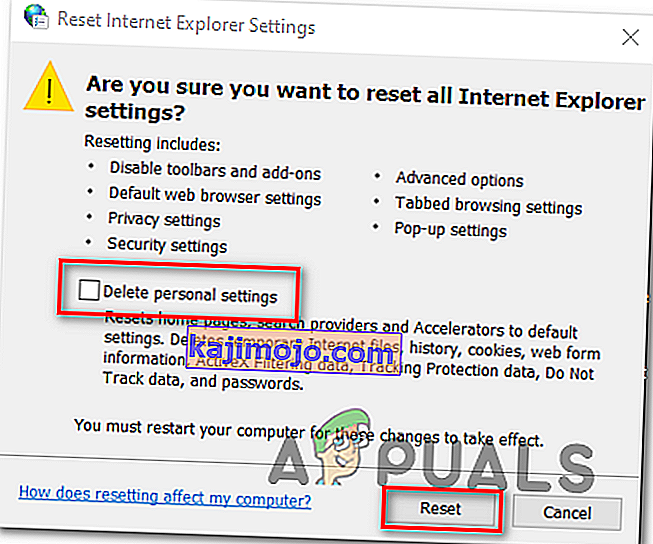
- Once you see the confirmation screen, ensure that the box associated with Delete personal settings is checked, then click on the Reset button.
- Wait until the operation is complete, then restart your machine and see if the issue is resolved at the next computer startup.


In case the same “An unhandled win32 exception occurred in iexplore.exe’ error is still occurring, move down to the next method below.
Solution 5: Disable Script Debugging and associated Registry Keys (if applicable)
If you’re encountering the issue with Internet Explorer on a machine that has VS installed on it, the issue can also occur due when Script Debugging is enabled and the registry entries end up containing corrupted data.
Several affected users that encountered this issue have confirmed that the issue was resolved after they accessed the Internet Options menu to disable Script Debugging and then deleted the associated keys using Registry Editor.
Here’s a quick guide on doing this in order to fix the “An unhandled win32 exception occurred in iexplorer.exe’ error:
- Press Windows key + R to open up a Run dialog box. Next, inside the text box, type ‘inetcpl.cpl’ and press Enter to open up the Internet Options menu. If you are prompted by the User Account Control (UAC), click Yes to grant administrative privileges.
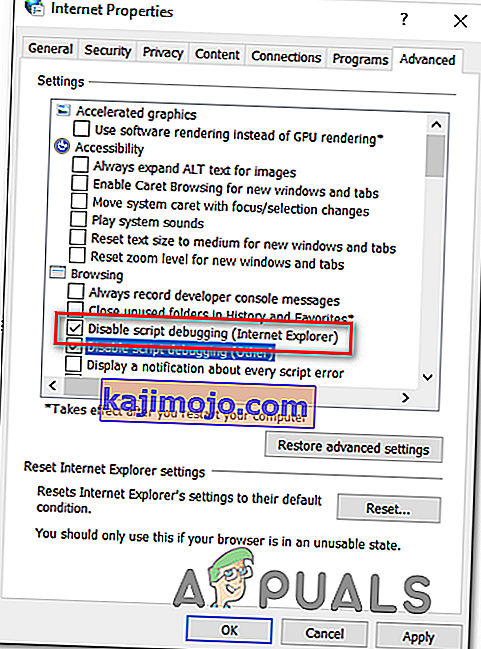
- Once you manage to find yourself inside the Internet Properties screen, use the menu at the top to select the Advanced tab.
- Inside the Internet Properties screen, scroll down through the Settings menu and check the box associated with Disable script debugging (Internet Explorer).
- Once the modification is enforced, hit Apply to save the changes, then close the Internet Properties window.
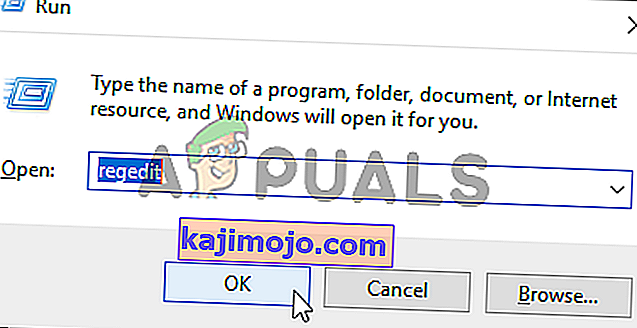
- Press Windows key + R once again to open up another dialog box. This time, type ‘regedit’ and press Enter to open up Registry Editor. You will need to grant admin access, so click Yes when prompted by the User Account Control window.
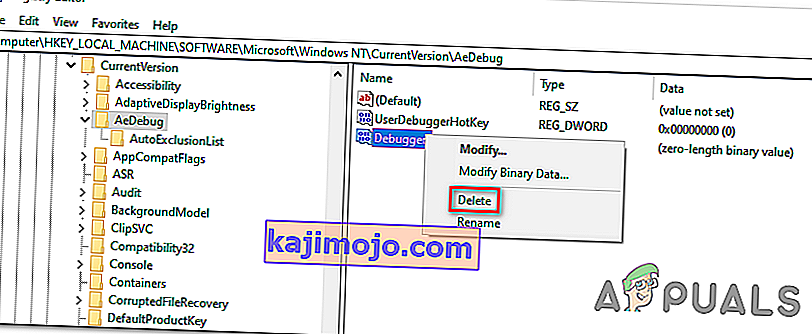
- Inside the Registry Editor, navigate to the following location using the left-hand menu:
HKEY_LOCAL_MACHINE\SOFTWARE\Microsoft\Windows NT\CurrentVersion\AeDebug (32 - Bit Machine) HKEY_LOCAL_MACHINE\SOFTWARE\Wow6432Node\Microsoft\Windows NT\CurrentVersion\AeDebug (64 - Bit Machine)
Note: The location of the file we need to delete is different depending on the Windows version that you’re using. If you have a 32 – bit Windows version use the first location, else, use the second.
- Once you arrive to the correct location, move down to the right-section, right-click on Debugger and choose Delete from the context menu.
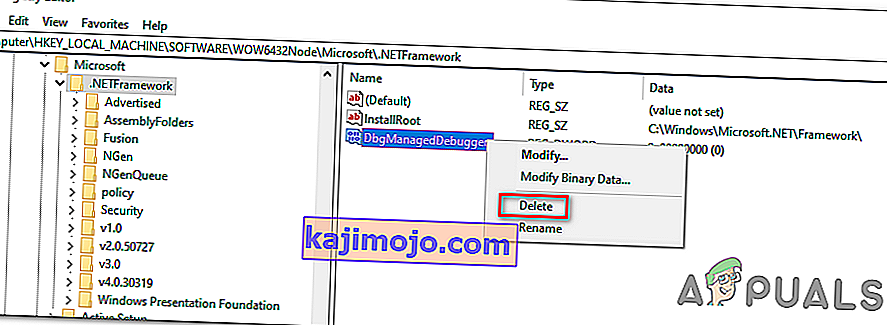
- Once this key is deleted, navigate to this second location:
HKEY_LOCAL_MACHINE\SOFTWARE\Microsoft\.NETFramework\ (32 - Bit Machine) HKEY_LOCAL_MACHINE\SOFTWARE\Wow6432Node\Microsoft\.NETFramework (64 - Bit Machine)
Note: Access the registry key associated with your Windows bit version that you’re using.
- When you arrive at the correct location, move over to the right-hand section and delete the DbgManagedDebugger value by right-clicking on it and choosing Delete from the context menu.
- After you manage to delete the value, close the Registry Editor and restart your computer.
- Once the next startup is complete, see if the same issue is still occurring.


In case the “An unhandled win32 exception occurred’ error is still occurring, move down to the next method below.
Solution 6: Install the Latest Version of NET Framework and Repair it
Having NET Framework installed on your computer is vital and plenty of modern games and programs depend on you having it installed. Before repairing it, follow the steps below in order to install the latest version on your computer.
Navigate to this link and click the red download button in order to download the latest version of the Microsoft .NET Framework. After the download has finished, locate the file you downloaded and run it. Note that you will need to have constant access to the Internet. Follow the instructions on-screen to proceed with the installation.
- After installing the latest version, it’s time to check its integrity. On your keyboard, use the Windows Key + R key combination to open the Run dialog box.
- Type in control.exe and click OK in order to open it.

- Click the Uninstall a Program option and click Turn Windows features on or off. Make sure you locate the .NET Framework 4.x.x entry and make sure it’s enabled. ‘x.x’ marks the latest version available for your operating system.
- If the checkbox next to .NET Framework 4.x.x is not enabled, enable it by clicking the box. Click OK to close the Windows Feature window and reboot the computer.

- If .Net Framework 4.x.x is already enabled, you can repair .Net Framework by clearing the box and rebooting the computer. After the computer has restarted, re-enable .Net Framework and restart the computer again.
Solution 7: Perform a Clean Boot
There are various other programs and services which can affect the proper functionality of the Microsoft .NET Framework suite. In most cases, the cause is the antivirus you have installed and you can try disabling it to see if the error persists. However, to make sure nothing can interfere with the installation, we recommend you perform a clean boot which will disable all non-Microsoft programs and services from starting up. This way, you can easily deduct just which program causes this error to happen!
- Use the Windows + R key combination on your keyboard. In the Run dialog box type MSCONFIG and click OK.
- Click on the Boot tab and uncheck the Safe Boot option (if checked).

- Under the General tab in the same window, click to select the Selective startup option, and then click to clear the Load startup items check box to make sure it’s not checked.
- Under the Services tab, click to select the Hide all Microsoft services check box, and then click Disable all.

- On the Startup tab, click Open Task Manager. In the Task Manager window under the Startup tab, right click on each startup item which is enabled and select Disable.

- After this, you will need to perform some of the most boring processes and that is enabling the Startup items one by one and restarting your computer. After that, you need to check whether the problem appears again. You will need to repeat the same process even for the Services which you have disabled in Step 4.
- Once you locate the problematic startup item or service, you can undertake action in order to solve the problem. If it is a program, you can reinstall it or repair If it is a service, you can disable it, etc.
Solution 8: Use SFC to Scan for Memory Leaks
It has been reported that the Microsoft .NET Framework corruption is related to faulty system files. These problems are rooted deep inside the system files and the only way to try to resolve them is by running the System File Checker (SFC). It will scan your system files for errors and possible repair or replace them. Follow the steps below in order to do so!
- Search for “Command Prompt” by typing it either right in the Start menu or by pressing the search button right next to it. Right-click the first entry which will pop up as a search result and select the “Run as administrator” context menu entry.
- Additionally, you can also use the Windows Logo Key + R key combination in order to bring up the Run dialog box. Type in “cmd” in the dialog box which appears and use the Ctrl + Shift + Enter key combination for admin Command Prompt.

- Type in the following commands in the window and make sure you press Enter after typing each one. Wait for the “Operation completed successfully” message or something similar to know that the method worked.
sfc /scannow
- Try to restart your computer and check to see if the Unhandled Exception has Occurred in your Application error continues to appear on your computer.
Solution 9: Performing a Clean Install
If none of the methods presented below have managed to help you in resolving the issue, it’s very likely that you’re dealing with some kind of Windows inconsistency that cannot be resolved conventionally.
If this scenario is applicable, you should be able to fix the issue by resetting every component associated with your Windows installation. If you want to go this route, you have two ways forward. It all boils down to the procedure that you want to follow:
- Repair install (in-place repair) – This procedure is the best approach when you need to refresh every OS component, but some users might end up considering it a little too tedious for their taste. Keep in mind that you will need a compatible installation media in order to enforce this fix, but the major advantage is that all your personal data (including games, applications and personal media) will be preserved even if you don’t back up your computer.
- Clean install – If you’re looking for the simplest solution, this is the way to go. You will not need an installation media to enforce it (it’s all done through the Windows GUI). But unless you back up your data in advance, be prepared for total data loss.