TeamViewer on kasulik videovestluste ja kaugjuhtimise programm ning see on üsna populaarne valik mängijate ja kaugteabe vahel. Kuid paljud kasutajad on teatanud, et nad lihtsalt ei suuda ühendust luua. Nad näevad problemaatilist veateadet oma ekraani allosas punase tule kõrval.

Probleemi lahendamiseks võite kasutada üsna palju meetodeid ja soovitame teil neid allpool vaadata. Neid on tavaliselt üsna lihtne teostada ja nad saavad teie probleemi hetkega lahendada!
Mis põhjustab Windowsis TeamVieweri tõrke „Pole valmis, kontrollige ühendust”?
Sellel konkreetsel probleemil on palju erinevaid põhjuseid ja õige tuvastamine võib olla ülioluline, kui te ei soovi kõiki loendis olevaid meetodeid proovida. See juhatab teid kiiremini lahenduse juurde ja seetõttu otsustasime luua loendi kõigist võimalikest põhjustest, mis asuvad allpool!
- Vale seadistus failis „hosts” - fail „hosts” sisaldab olulist teavet Interneti-ühenduse loomise kohta ja on võimalik, et TeamVieweri kirje on rikutud. Selle kirje kustutamine põhjustab Windowsi selle uuesti loomise, nii et proovige probleem lahendada.
- Viirusetõrje- või tulemüüriprobleemid - kui teie käitatav tulemüür või viirusetõrje takistab TeamVieweri juurdepääsu Internetile, proovige kindlasti teha selle peamise käivitatava faili suhtes erand.
- DNS ja Winsocki probleemid - DNS-aadresse saab muuta ja Winsocki lähtestada. Paljude kasutajate jaoks on kõik probleemi lahendamiseks vaja, nii et proovige seda kindlasti!
- IPv6-ühenduvus - TeamViewer lihtsalt ei tööta mõnikord IPv6-ga, nii et veenduge, et selle probleemi lahendamiseks kaalute selle keelamist. See ei tee haiget ja võib TeamVieweri tagasi tuua!
- TeamVieweri uus liides - kasutajaliides ei peaks olema seotud ühenduvusprobleemidega, kuid kindlasti oli see nii mitme TeamVieweri kasutaja puhul. Vana liidese taastamine suutis nende jaoks probleemi lahendada.
Lahendus 1. Eemaldage TeamViewer hostifailist
Suure tõenäosusega on TeamVieweri kanne teie arvuti failis „hosts” rikutud. See võib näidata aadresse ja andmeid, mis on täiesti valed, ja soovitame teil selle kirje kustutada. Kui olete selle uuesti avanud, luuakse kirje uuesti ja probleem loodetavasti lakkab ilmumast!
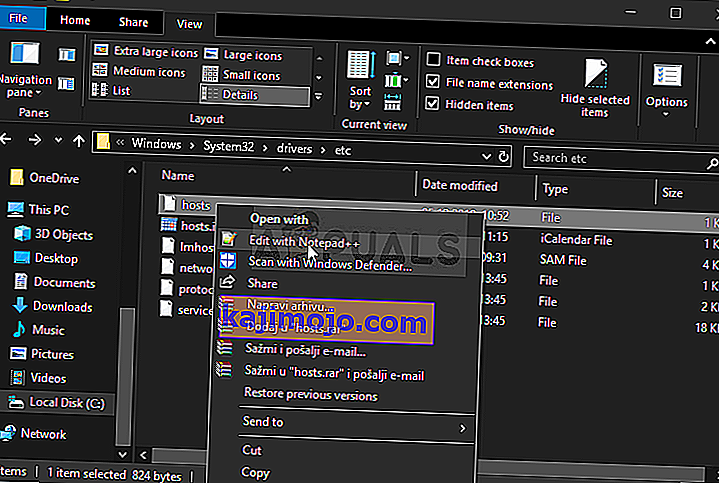
- Navigeerige asukohta C >> Windows >> System32 >> Draiverid >> Jne , navigeerides sinna pärast File Exploreri avamist. Kõigepealt klõpsake kohaliku arvuti C leidmiseks ja avamiseks vasakul küljel paanil See arvuti või Minu arvuti .
- Kui te ei näe Windowsi kausta, peate võib-olla sisse lülitama suvandi, mis võimaldab teil näha peidetud faile ja kaustu. Klõpsake File Exploreri ülemises menüüs vahekaarti „ Vaade “ ja klõpsake nupul „ Peidetud üksused “. Kuva / peida failihaldur näitab peidetud faile ja mäletab seda sätet, kuni seda uuesti muudate.

- Leidke hosts faili jne kaust, paremklõpsake seda ja valida Ava Notepad . Kasutage klahvikombinatsiooni Ctrl + F ja veenduge, et enne järgmisele nupule klõpsamist sisestate väljale Leia mida välja „teamviewer”.
- Leidke failist jaotis TeamViewer. See peaks algama tähega „#Teamviewer” ja veenduma, et olete valinud kõik, mis sellele kuulub, paremklõpsake valikut ja valige kontekstimenüüst nupp Kustuta.
- Muudatuste salvestamiseks või klahvikombinatsiooni Ctrl + S kasutamiseks klõpsake nuppu Fail >> Salvesta . Sulgege Notepad ja taaskäivitage arvuti. Kontrollige, kas probleem püsib seoses TeamVieweri „Pole valmis. Kontrollige ühendust ”tõrketeade!
2. lahendus: muutke oma DNS-aadressi
Kasutajad on öelnud, et nad suutsid probleemi lahendada lihtsalt muutes teie Interneti-teenuse pakkuja (Internet Service Provider) pakutavat DNS-i ja hakanud kasutama teist. See võib olla arvuti DNS, kus probleemi ei kuvata, kuid paljud kasutajad kasutasid probleemi lahendamiseks lihtsalt Google'i DNS-i. Arvuti DNS-aadressi muutmiseks toimige järgmiselt.
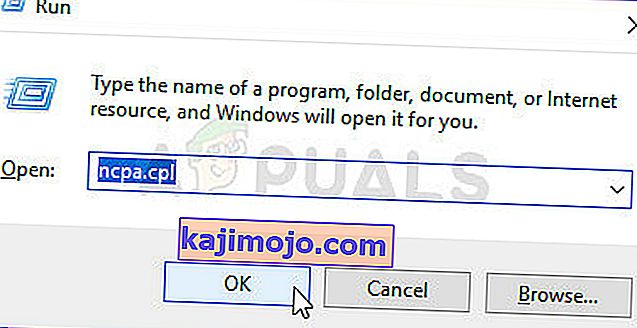
- Kasutage Windows + R klahvikombinatsiooni , mis peaks avama Run kommunaalteenuste kasti, kus sa peaksid kirjutage " käsk ncpa.cpl " tekstikasti ja klõpsa OK, et avada Internet Connection Settings kanne Control Panel .
- Sama saab teha ka lihtsalt juhtpaneeli käsitsi avamisega . Lülitage akna paremas ülanurgas suvand Vaade kategooria järgi kategooriale ja klõpsake ülaosas valikul Võrk ja Internet . Klõpsake selle avamiseks nuppu Võrgu- ja ühiskasutuskeskus, enne kui hakkate vasakpoolses menüüs nuppu Muuda adapteri sätteid leidma ja sellel klõpsama.
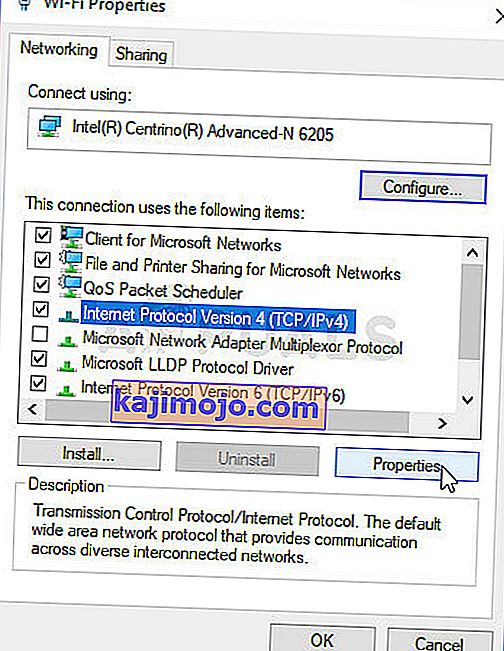
- Nüüd, kui Interneti-ühenduse ekraan on avatud mis tahes ülaltoodud meetodil, topeltklõpsake oma aktiivset võrgukaarti (seda, mida kasutate Interneti-ühenduse loomiseks) ja klõpsake alloleval nupul Atribuudid, kui teil on praeguse kasutajakonto administraatori õigused.
- Leidke loendist üksus Interneti-protokolli versioon 4 (TCP / IPv4) . Selle valimiseks klõpsake seda ja klõpsake allpool asuvat nuppu Atribuudid .
- Püsige vahekaardil Üldine ja muutke akna Atribuudid raadionuppu olekuks „ Kasuta järgmisi DNS-serveri aadresse ”, kui see oli määratud teisele võimalusele.
- Mõlemal juhul määrake Eelistatud DNS-server väärtuseks 8.8.8.8 ja Alternatiivne DNS-server väärtuseks 8.8.4.4.
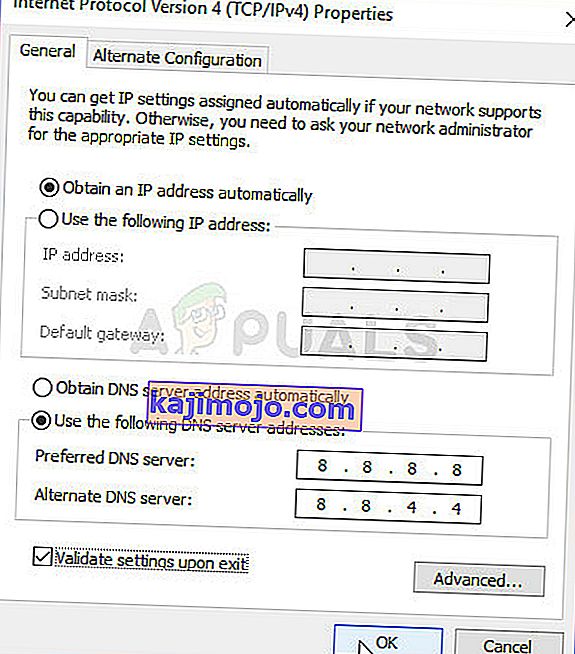
- Hoidke ruut „ Valideeri väljumisel seaded ” ja klõpsake nuppu OK muudatuste viivitamatuks rakendamiseks. Kontrollige, kas TeamViewer „Pole valmis. Kontrollige oma ühendust ”kuvatakse teie arvutis endiselt tõrketeade!


3. lahendus: lähtestage Winsock
„ Netsh Winsock reset ” on kasulik käsk, mida saate käsuviibas kasutada, et lähtestada Winsocki kataloog tagasi vaikeseadele või selle puhtale olekule. Võite proovida seda meetodit, kui teil pole TeamVieweris ühenduse loomise võimetust.
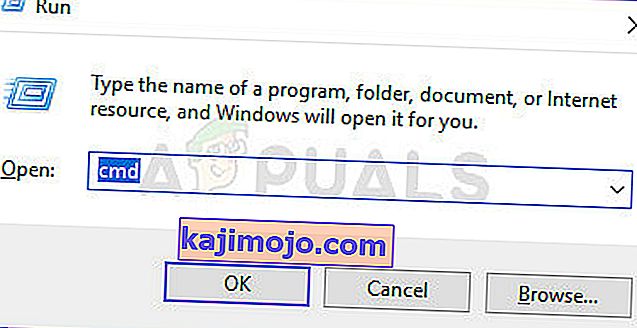
- Otsige „ Käsuviip ”, tippides selle kas otse menüüsse Start või vajutades selle kõrval olevat otsimisnuppu. Paremklõpsake esimest kirjet, mis kuvatakse otsingutulemina, ja valige kontekstimenüü kirje „ Käivita administraatorina ”.
- Lisaks saate dialoogiboksi Run käivitamiseks kasutada ka Windowsi logoklahvi + R- klahvikombinatsiooni. Sisestage ilmuvas dialoogiboksi „cmd” ja kasutage klahvikombinatsiooni Ctrl + Shift + Enter, et käivitada käsuviip administraatoriõiguste abil.
- Sisestage aknas järgmised käsud ja vajutage pärast nende sisestamist kindlasti Enter. Oodake teadet „ Winsocki lähtestamine õnnestus edukalt ” või midagi muud, et teada saada, et meetod on töötanud ja te pole tippimise ajal vigu teinud. Kontrollige, kas probleem püsib.

netsh winsock reset netsh int ip lähtestamine

4. lahendus: ärge kasutage uut kasutajaliidest
Kasutajaliides ei tohiks olla kuidagi ühendatud TeamVieweri Interneti-ühendusega, kuid kummalisel kombel on paljud kasutajad teatanud, et nad suutsid selle probleemi lahendada lihtsalt programmi vana kujunduse juurde naasmisega. Seda saab teha TeamVieweri seadetes, nii et järgige kindlasti järgmisi samme ja proovige see ühenduvusprobleem lahendada.
- Avage TeamViewer , topeltklõpsates selle ikooni töölaualt või otsides seda pärast menüü Start avamist ja paremklõpsates ülemisel tulemusel.
- Klõpsake avakuval menüüribal nuppu Lisad ja valige kuvatavast loendist kirje Valikud .
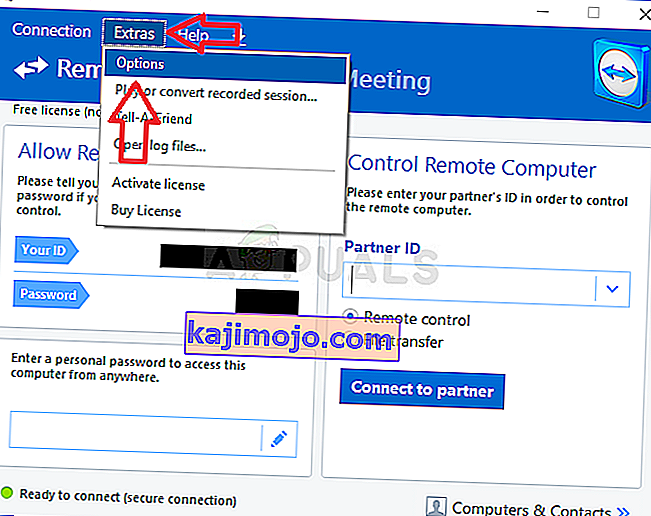
- Liikuge vasakpoolses navigeerimismenüüs TeamVieweri suvandite vahekaardile Täpsem ja kontrollige jaotises Üldised täpsemad seaded suvandit " Kasuta uut kasutajaliidest ". Enne tehtud muudatuste kinnitamist tühjendage kindlasti selle kõrval olev ruut.

- Ava TeamViewer uuesti ja kontrollige, kas TeamViewer „Pole valmis. Kontrollige oma ühendust ”kuvatakse teie arvutis endiselt tõrketeade!


Lahendus 5. Lisage failile Teamviewer_Service.exe erand
Mõnikord ei tunnista viirusetõrjevahendid programmi jõupingutusi Interneti-ühenduse loomiseks kahjututena ja see blokeerib TeamVieweri funktsioone sageli. Viirusetõrjele tõendamaks, et programm on kahjutu, peate selle lisama loendisse Erandid / välistused!
- Open the antivirus user interface by double-clicking on its icon at the system tray (right part of the taskbar at the bottom of the window) or by searching for it in the Start menu.
- The Exceptions or Exclusions setting is located in different spots concerning different antivirus tools. It can often be found simply without much hassle but here are some quick guides on how to find it in the most popular antivirus tools:
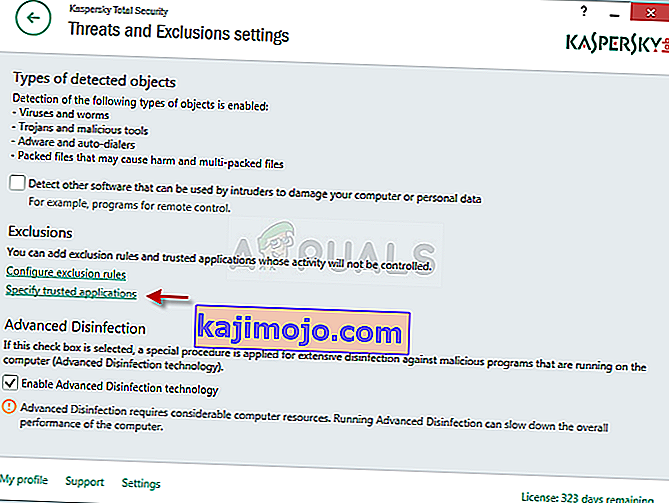
Kaspersky Internet Security: Home >> Settings >> Additional >> Threats and Exclusions >> Exclusions >> Specify Trusted Applications >> Add.
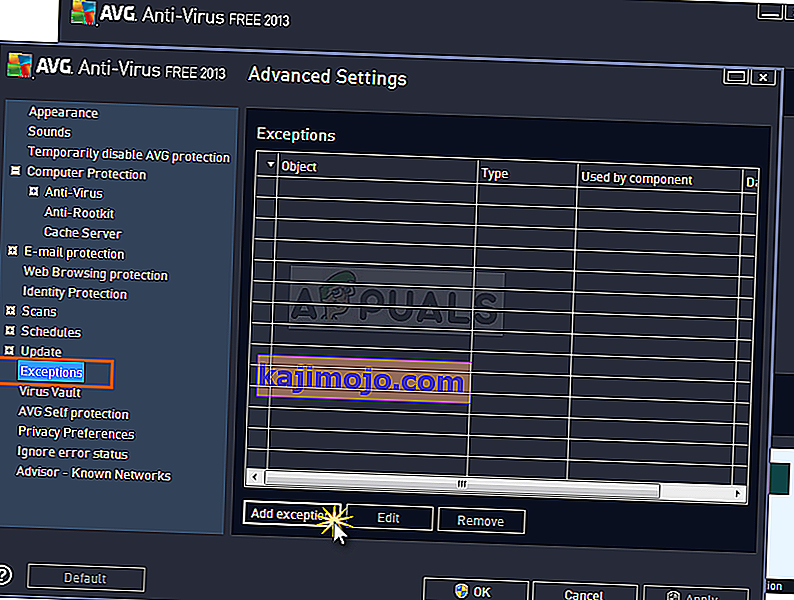
AVG: Home >> Settings >> Components >> Web Shield >> Exceptions.
Avast : Home >> Settings >> General >> Exclusions
- You will need to add the Teamviewer_Service.exe executable in the box which will appear prompting you to navigate to the folder. It should be in the same folder where you decided to install TeamViewer in. By default, it’s:
C:\Program Files (x86)\TeamViewer
- Check to see if you are now able to use TeamViewer without receiving the problematic error message. If it still won’t work, try restarting your computer and try again. The last step would be to uninstall the antivirus and try a different one if the problem persists.


Solution 6: Allow it in Windows Defender Firewall
For TeamViewer’s features to work properly, the app needs to have uninterrupted access to the Internet and its servers to work properly. Windows Defender Firewall is often to blame in such cases and we recommend you make an exception for the Teamviewer_Service.exe executable inside the Windows Defender Firewall!
- Open up Control Panel by searching for the utility in the Start button or by clicking the Search button or the Cortana button at the left part of your taskbar (bottom left part of your screen).
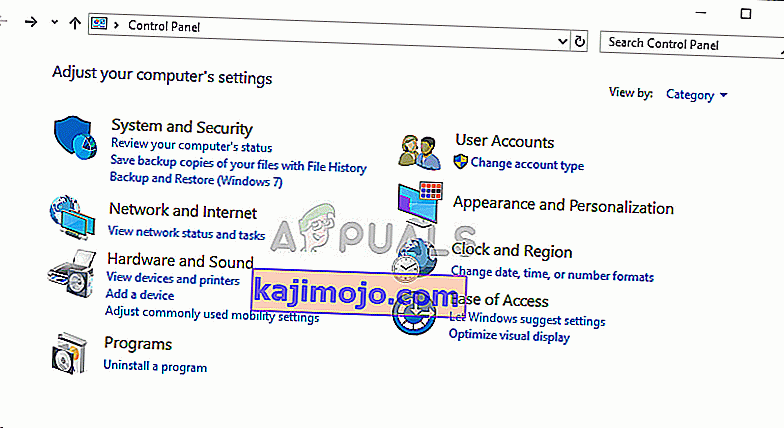
- After Control Panel opens, change the view to Large or Small icons and navigate to the bottom to open the Windows Defender Firewall option.
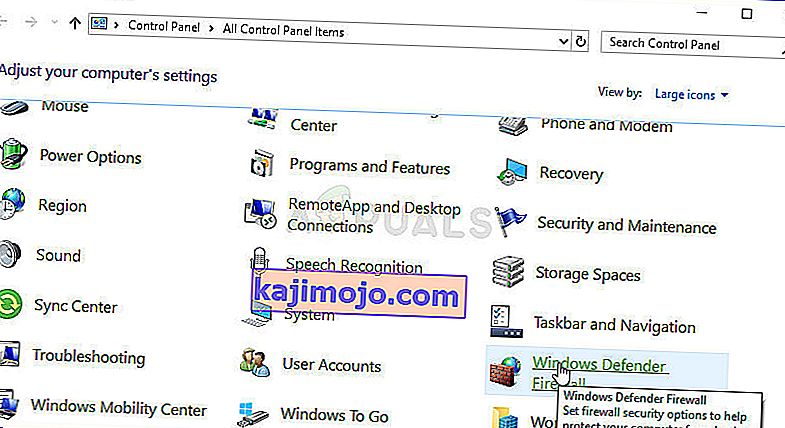
- Click on Windows Defender Firewall and click on the Allow an app or feature through Windows Firewall option from the left side list of options. A list of installed apps should open. Click the Change settings button at the top of the screen and provide administrator permissions. Try locating the executable inside. If it’s not there, click the Allow another app button below.

- Navigate to where you installed TeamViewer (C:\Program Files (x86)\TeamViewer by default) and choose the Teamviewer_Service.exe file.
- After locating it, click the Network types button at the top and make sure you check the boxes next to both Private and Public entries before clicking OK >> Add.
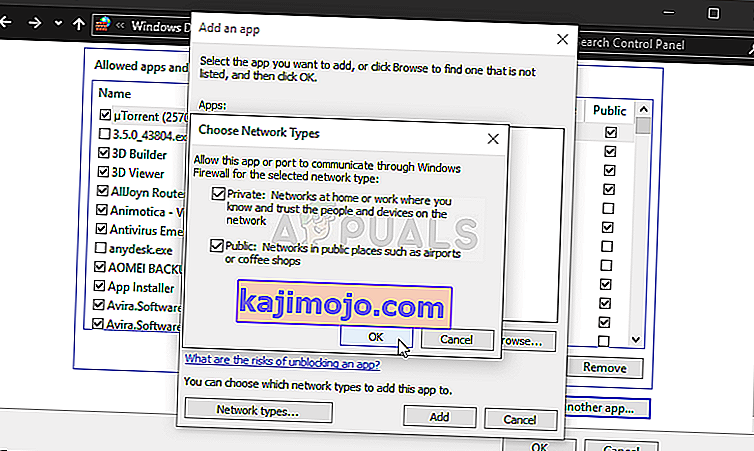
- Click OK and restart your computer before checking whether the TeamViewer “Not ready. Check your connection” error message still appears on your computer.


Solution 7: Disable IPv6
Disabling Internet Protocol version 6 connectivity on your computer managed to resolve the problem for many users and it’s an easy way to resolve the problem. This makes this method worthy and you shouldn’t skip it during your troubleshooting process.
- Use the Windows + R key combo which should immediately open the Run dialog box where you should type ‘ncpa.cpl’ in the bar and click OK to open the Internet Connection settings item in Control Panel.
- The same process can also be done by manually opening the Control Panel. Switch the View by setting at the top right section of the window to Category and click on Network and Internet at the top. Click the Network and Sharing center button to open it. Try to locate the Change adapter settings button at the left menu and click on it.
- When the Internet Connection window opens, double-click on your active Network Adapter.
- Then click Properties and locate the Internet Protocol Version 6 entry on the list. Disable the checkbox next to this entry and click OK. Restart your computer to confirm the changes and check to see if the problem persists.


Solution 8: Restart the TeamViewer Service
Stopping the TeamViewer service from running will effectively restart the whole process and many users have reported that it only took them a few minutes to get TeamViewer to work again. Before starting, make sure you have closed TeamViewer completely.
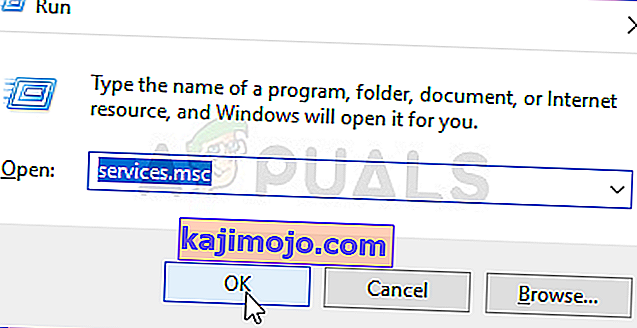
- Open the Run utility by using the Windows Key + R key combination on your keyboard (press these keys at the same time. Type “services.msc” in the newly opened box without the quotation marks and click OK to open the Services tool.
- The alternative way is to open the Control Panel by locating it in the Start menu. You can also search for it using the Start menu’s search button.
- After the Control Panel window opens, change the “View by” option at the top right part of the window to “Large Icons” and scroll down until you locate the Administrative Tools entry. Click on it and locate the Services shortcut at the bottom. Click on it to open it as well.
- Locate the TeamViewer Service on the list, right-click on it and select Properties from the context menu which appears.
- If the service is started (you can check that just next to the Service status message), you should stop it for now by clicking the Stop button in the middle of the window. If it is stopped, leave it stopped until we proceed.
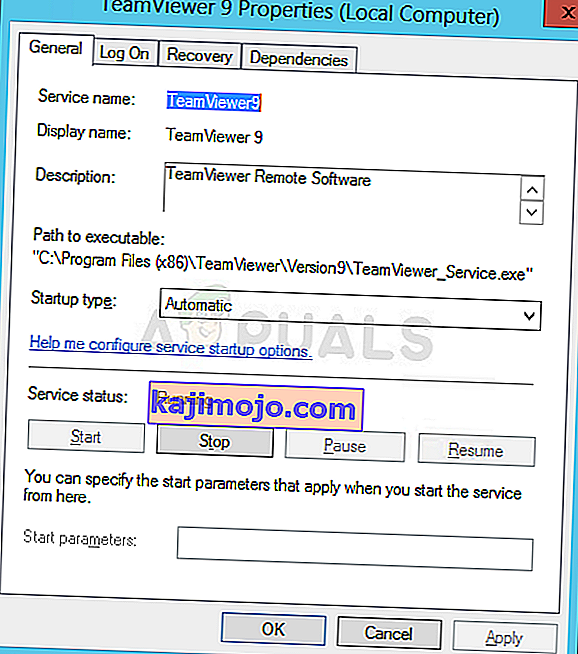
- Make sure that the option under the Startup type menu in the service’s properties window is set to Automatic before you proceed with other steps. Confirm any dialogue boxes which may appear when changing the startup type. Click on the Start button in the middle of the window before exiting.


Solution 9: Reinstall TeamViewer
If all methods above fail to work, reinstalling TeamViewer is the last method which can help you resolve the problem on your computer. It should be fast and painless if you follow all the steps properly! You will also install the latest version which contains the patch to the specific issue you are having!
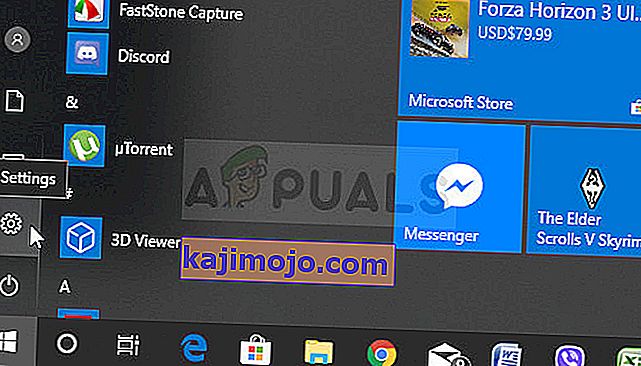
- Click the Start menu and open Control Panel by searching for it simply by typing with the Start menu window open. Alternatively, you can click the cog icon in the lower-left part of the Start menu to open the Settings app if you are using Windows 10.
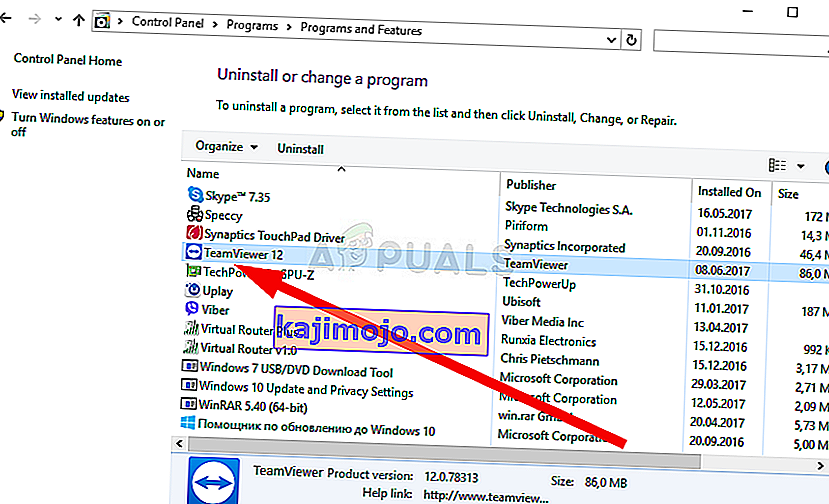
- In Control Panel, select the View as: Category option at the top right corner of the Control Panel window and click on Uninstall a Program under the Programs section.
- If you are using the Settings app, clicking on Apps should immediately open a list of all installed programs on your PC so wait for a while for it to load
- Locate TeamViewer in Control Panel or Settings and click on Uninstall/Repair. Follow any instructions which appear afterward to uninstall it completely.
- Download the latest version of TeamViewer by visiting this link. Download its setup file, run it from the Downloads folder, follow the instructions on screen, and check to see if the problem persists after reinstalling TeamViewer!

