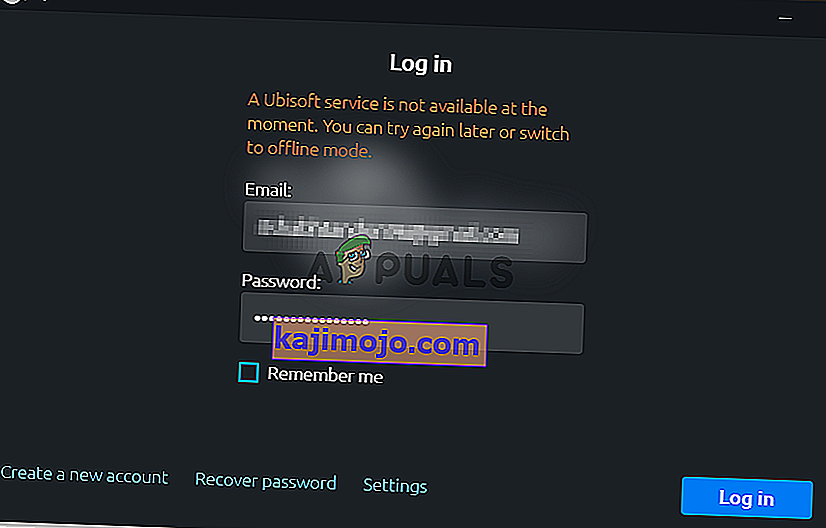
Uplay kuvab Ubisofti käivitamisel tõrke „Ubisofti teenus pole praegu saadaval”. Uplay-d kasutatakse Ubisofti mängude digitaalse levitamise, DRM-i, mitme mängija ja side haldamiseks ning see on iga Ubisofti mängu oluline osa. Viga ilmub siis, kui proovite mängu käivitada või arvutisse Uplay sisse logida.
Õnneks postitasid paljud kasutajad meetodid, mida nad probleemi lahendamiseks kasutasid, oma arvutisse. Oleme nende meetodite jaoks andnud üksikasjalikud juhised, nii et veenduge, et järgiksite neid hoolikalt ja loodetavasti lahendage praegune probleem!
Mis põhjustab Windowsi tõrke „Ubisofti teenus pole praegu saadaval”
Selle probleemi põhjuseks võib olla üsna mitu erinevat põhjust ja soovitame teil tutvuda allpool koostatud loendiga. Õige tuvastamine aitab teil õige tõrkeotsingu meetodi kiiremini valida. Edu!
- Kellaaeg ja kuupäev on valesti määratud - peate veenduma, et kellaaja ja kuupäeva seaded on teie arvutis õigesti konfigureeritud. Peaaegu kõik võrguteenused sõltuvad kellaaja ja kuupäeva õigest seadistamisest. Vaadake, kas see probleemi lahendab.
- Käib katkine protsess - programmis DataData on imelikult käivitatav nimi, mis töötab iga kord, kui mäng algab. Selle lõpetamine võib probleemi lahendada nagu paljudel kasutajatel!
- Hamachi - kasutajad, kellel on Hamachi arvutisse installitud, teatasid, et probleem lakkas ilmnema kohe, kui nad Hamachi desinstallisid.
- IPv6 - tundub, et probleem ilmneb ainult siis, kui ühenduse loomiseks kasutatakse IPv6-protokolli. IPv4-le üleminek võib probleemi hõlpsasti lahendada.
- Võrguprobleemid - teie arvuti erinevate võrguseadetega seotud probleeme saab lahendada mitmel viisil: hosti faili lähtestamine, võrgu lähtestamine või staatiliste IP- ja DNS-aadresside määramine.
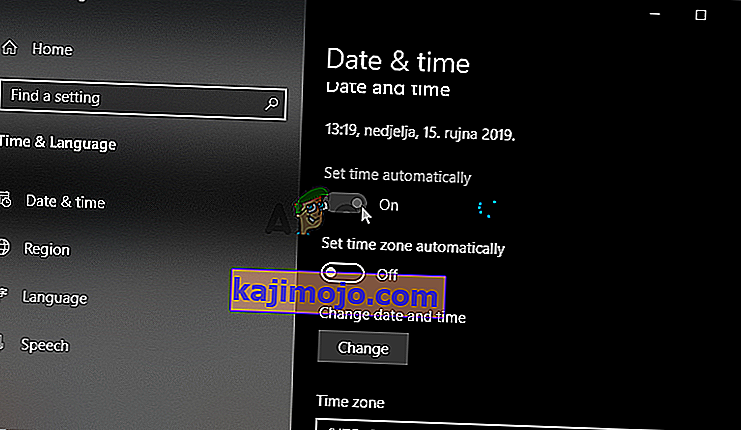
Lahendus 1. Kontrollige arvutist kellaaega ja kuupäeva
Ubisofti ja Uplay võrguteenuste kasutamine peab enesestmõistetavaks, et kellaaeg ja kuupäev on teie arvutis õigesti seadistatud. See on standard, mida kasutatakse mitmesuguste turbeprobleemide ennetamiseks ja nende seadete õige seadistamine on see, mida peate tegema. Kellaaja ja kuupäeva õigeks seadistamiseks arvutis järgige allolevaid juhiseid!
- Avage Windows 10 sätted, avades menüü Start ja avades tööriista Seaded , klõpsates Start-menüü vasakus alanurgas hammasrattaikooni.
- Teise võimalusena saate otse seadete avamiseks kasutada Windowsi klahvi + I klahvikombinatsiooni . Klõpsake jaotise Aeg ja keel avamiseks ja liikuge vasakpoolses navigeerimismenüüs vahekaardile Kuupäev ja kellaaeg .

- Kui kuupäev ja kellaaeg vahekaarti veenduge, et teie arvuti kuupäev ja kellaaeg on õigesti seadistatud. Kui kellaaeg pole õige, võite proovida sisse lülitada suvandi Määra kellaaeg olenevalt praegusest olekust.
- Kuupäeva muutmiseks klõpsake jaotises Kuupäev rippmenüü nuppu, et leida kalendrist praegune kuu ja seejärel klõpsake praegust kuupäeva.
- Kellaaja muutmiseks klõpsake jaotises Aeg tundidel, minutitel või sekunditel, mida soovite muuta, ja libistage seejärel väärtusi, kuni olete oma ajavööndi järgi õige.
- Kui olete aja seadistused muutnud, klõpsake nuppu OK .
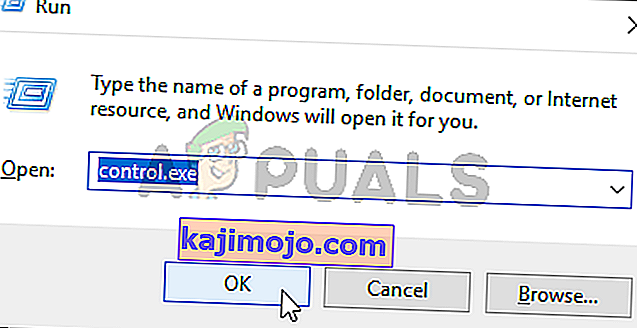
Alternatiiv : Inimesed, kes ei suutnud oma seadistusi sellisel viisil muutes oma probleemi lahendada, saavad seda teha ka juhtpaneelil. Seaded on sarnased, kuid nüüd saate määrata oma aja Interneti-ajaga sünkroonimiseks.
- Avage juhtpaneel , otsides seda nupust Start või klõpsates tegumiriba vasakus osas (ekraani vasakus alanurgas) nuppu Otsi või Cortana. Selle saate avada ka Windows Key + R-klahvikombinatsiooni abil , tippige väljale Run käsk “ control.exe ” ja klõpsake juhtpaneeli käivitamiseks nuppu OK .
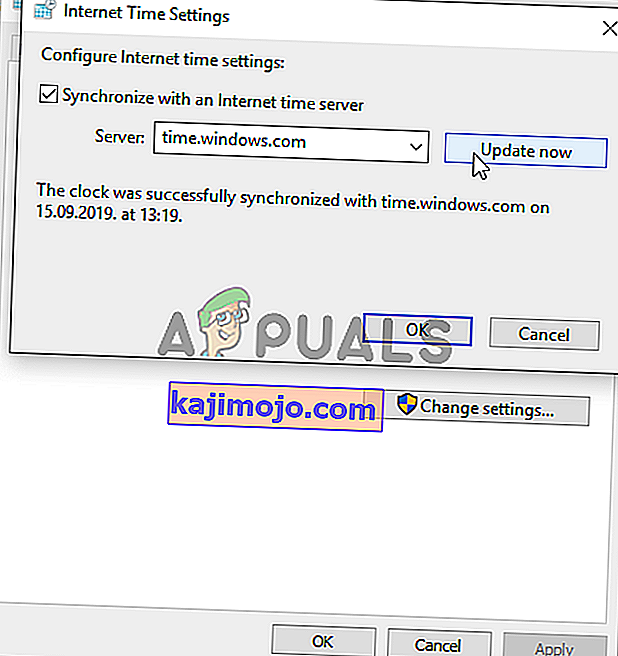
- Pärast juhtpaneeli avanemist muutke vaate ikooniks Suur või Väike ja navigeerige aknast alla, et avada suvand Kuupäev ja kellaaeg . Klõpsake vahekaardil Kuupäev ja kellaaeg nuppu Muuda kuupäeva ja kellaaega ning saate selle siin seadistada.
- Teise võimalusena võite sünkroonida aja veebiajaserveriga, järgides neid samme. Navigeerige akna Kuupäev ja kellaaja vahekaardile Interneti-aeg ja klõpsake nuppu Muuda sätteid Märkige ruut suvandi Sünkrooni Interneti-aja serveriga kõrval ja klõpsake nuppu Värskenda kohe . Seejärel klõpsake nuppu OK, Rakenda, OK ja sulgege juhtpaneel.
- Kui olete ülaltoodud toimingud teinud, peaks probleem olema lahendatud.


2. lahendus: lõpetage vigane protsess tegumihalduris
Programmis DataData käivitatakse kindel fail. See kuulub Ubisoftile, kuid sageli rikutakse ja see takistab kasutajatel utiliiti üldse avamast. Selle nimi pole kõigi jaoks ühesugune, kuid saate selle ülesannete halduris ära tunda täiesti mitteseotud tähtede stringina. Selle ülesande lõpetamiseks toimige järgmiselt.
Avage Uplay või Ubisofti mäng ja oodake, kuni ekraanil palutakse sisestada oma volitused. Ilmuma peaks viga „Ubisofti teenus pole praegu saadaval”.
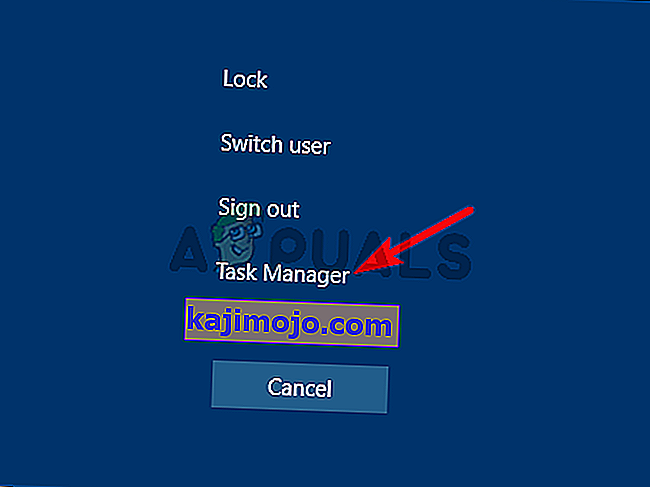
- Kasutage klahvikombinatsiooni Ctrl + Shift + Esc , vajutades samal ajal klahve, et avada Task Manager utiliit.
- Teise võimalusena võite kasutada klahvikombinatsiooni Ctrl + Alt + Del ja valida hüpikakna siniselt ekraanilt Task Manager, mis kuvatakse mitme suvandiga. Samuti saate seda otsida menüüst Start.
- Tegumihalduri laiendamiseks klõpsake akna vasakus alanurgas nuppu Rohkem üksikasju . Püsige protsessides. Kerige alla, kuni jõuate loendisse Taustaprotsessid ja otsige faili, mis sarnaneb selle nimega alloleval fotol olevale.
- Valige see ja valige akna paremas alanurgas suvand Lõpeta ülesanne .
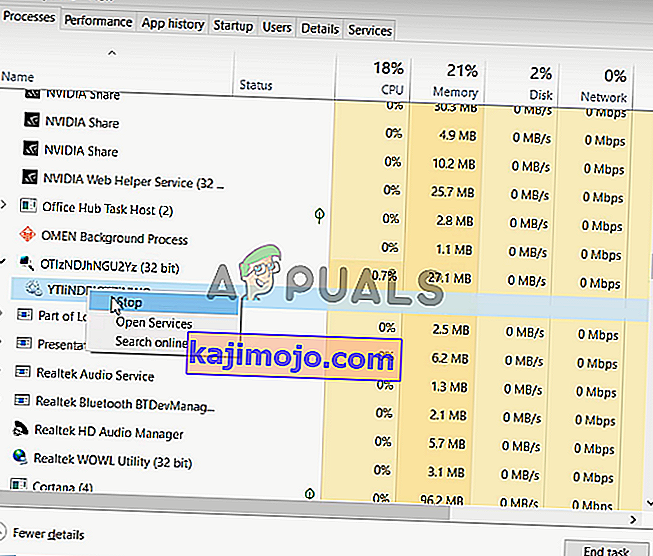
- Kinnitage kõik dialoogid, mis võivad ülesande lõpetamisel ilmuda, ja kontrollige, kas saate nüüd oma arvutisse Uplay sisse logida!
3. lahendus: desinstallige Hamachi
Hamachi kasutamine on mõne kasutaja jaoks konkreetne põhjus. See on problemaatiline, kuna kasutajad peavad valima kahe programmi vahel. Uplay on siiski olulisem, seega peaksite mõnda aega kaaluma Hamachi desinstallimist, et näha, kas probleem on lahendatud. Järgige allolevaid juhiseid!
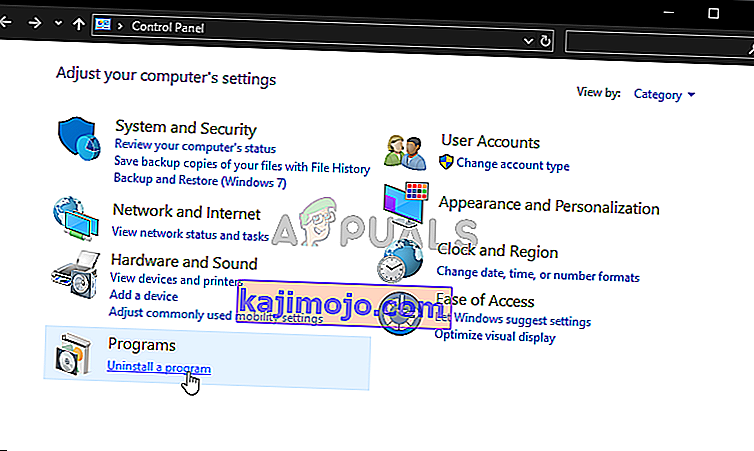
- Klõpsake menüü Start nuppu ja avage seda otsides juhtpaneel . Teise võimalusena võite seadete avamiseks klõpsata hammasrattaikoonil, kui kasutate Windows 10.
- Juhtpaneelil valige paremas ülanurgas Kuva nimega - kategooria ja klõpsake jaotises Programmid Programmi desinstallimine
- Kui kasutate rakenduses Seaded, klõpsates Apps kohe loendi avamiseks kõik installitud programmid arvutis.
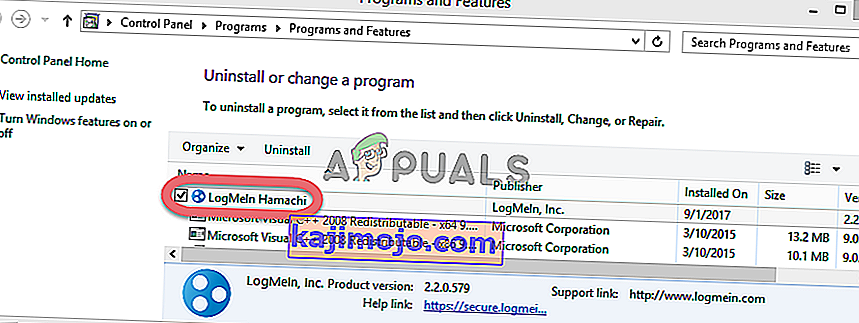
- Leidke juhtpaneelilt või seadetest LogMeIn Hamachi tööriist ja klõpsake nuppu Desinstalli . Selle desinstallimisviisard peaks avanema, nii et järgige selle desinstallimiseks juhiseid.
- Kui desinstalliprotsess on protsessi lõpetanud, klõpsake nuppu Lõpeta ja taaskäivitage arvuti, et näha, kas tõrkeid ikka ilmub.


4. lahendus: keelake IPv6
Internetiprotokolli versiooni 6 ühenduvuse keelamine arvutis suutis probleemi lahendada paljude kasutajate jaoks ja see on lihtne viis probleemi lahendamiseks. See muudab selle meetodi vääriliseks ja te ei tohiks seda tõrkeotsingu käigus vahele jätta.
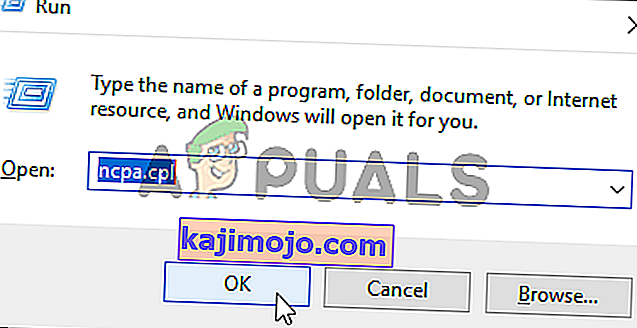
- Kasutage klahvikombinatsiooni Windows + R, mis peaks kohe avama dialoogiboksi Käivita, kuhu peaksite ribale tippima „ ncpa.cpl ” ja klõpsama juhtpaneeli Interneti-ühenduse sätete üksuse avamiseks nuppu OK.
- The same process can also be done by manually opening the Control Panel. Switch the View by setting at the top right section of the window to Category and click on Network and Internet at the top. Click the Network and Sharing center button to open it. Try to locate the Change adapter settings button at the left menu and click on it.
- When the Internet Connection window opens, double-click on your active Network Adapter.
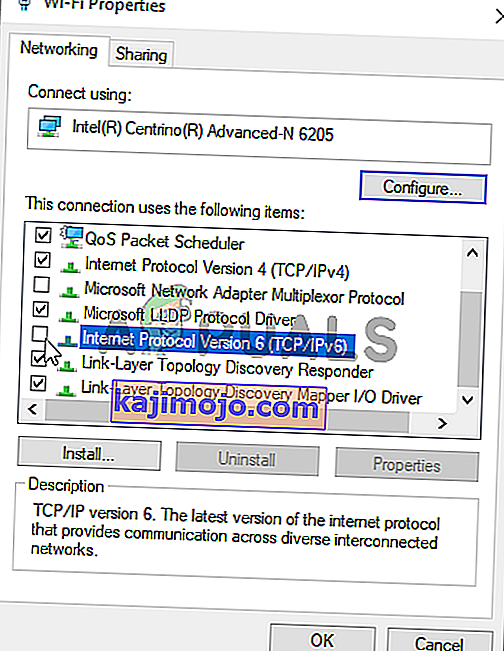
- Then click Properties and locate the Internet Protocol Version 6 entry on the list. Disable the checkbox next to this entry and click OK. Restart your computer to confirm the changes and check to see if the problem persists.
Solution 5: Use Static IP and DNS Addresses
By default, IP and DNS address of your computer change over time. This is usually not problematic but users have reported that assigning static IP and DNS addresses to your computer can help you resolve the “A Ubisoft service is currently unavailable” error on Windows. Follow the steps below to try out this method!
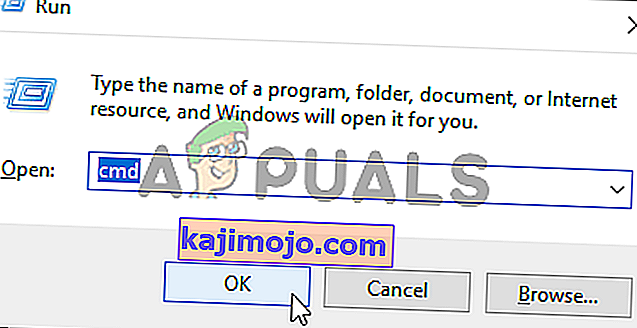
- Make sure you open a Command Prompt window by searching for “cmd” or “Command Prompt” in the Start menu.
- Type in the command which will be displayed below and scroll down towards the network adapter which corresponds with the connection you are using. Take note of Default Gateway, Subnet Mask, MAC and DNS
ipconfig /all
- After that, use the Windows + R key combo which should immediately open the Run dialog box where you need to type ‘ncpa.cpl’ in the bar and tap OK to open the Internet Connection settings item in Control Panel.

- Left-click your active network adapter and click on the Properties Locate the Internet Protocol Version 4 (TCP/IPv4) item on the list. Tap on it to select it and click the Properties button below.
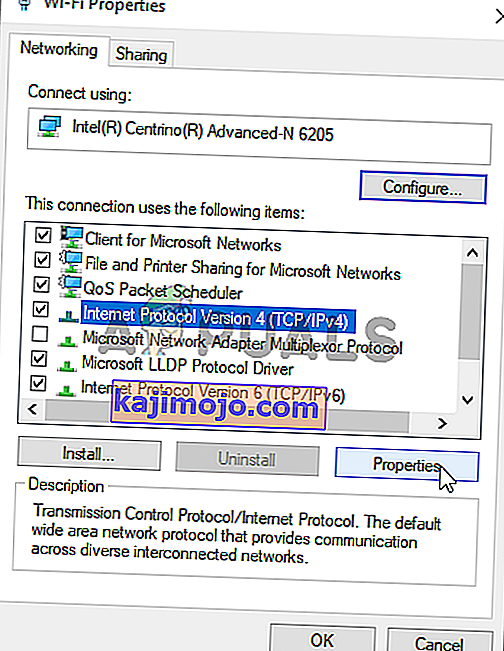
- Stay in the General tab and switch the radio button in the Properties window to “Use the following DNS server addresses” and use 8.8.8 and 8.8.4.4 respectively. Switch to “Use the following IP address” and use the same number as the Default Gateway you took note of but change the last digit after the last dot so something else. Fill out other information the same as you took note.
Solution 6: Completely Reset Your Hosts File
The host’s file is an important file when it comes to networking issues. Resettings it can resolve many different problems, including the “A Ubisoft service is currently unavailable” error. If for some reason, you find that your hosts file has been compromised or if you start experiencing this problem with Origin, you can reset the file back to default by following the steps below.
- Navigate to the location C >> Windows >> System32 >> Drivers >> Etc by navigating to it after opening the File Explorer. First, click This PC or My Computer from the left side pane to locate and open your Local Disk C.
- If you are unable to see the Windows folder, you may need to turn on the option which enables you to see hidden files and folders. Click the “View” tab in File Explorer’s top menu and click the “Hidden items” checkbox in the Show/hide File Explorer will show the hidden files and will remember this setting until you change it again.
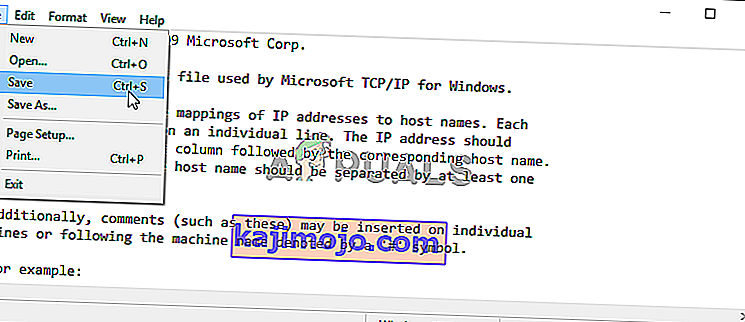
- Locate the hosts file in the Etc folder, right-click on it, and choose to Open it with Notepad. Use the Ctrl + A key combination to select all text and click Delete or Backspace to delete it. After that, paste the following text inside:
# Copyright (c) 1993-2006 Microsoft Corp. # # This is a sample HOSTS file used by Microsoft TCP/IP for Windows. # # This file contains the mappings of IP addresses to hostnames. Each # entry should be kept on an individual line. The IP address should # be placed in the first column followed by the corresponding host name. # The IP address and the host name should be separated by at least one # space. # # Additionally, comments (such as these) may be inserted on individual # lines or following the machine name denoted by a '#' symbol. # # For example: # # 102.54.94.97 rhino.acme.com # source server # 38.25.63.10 x.acme.com # x client host # localhost name resolution is handled within DNS itself. # 127.0.0.1 localhost # ::1 localhost
- Click File >> Save to save the changes. Exit Notepad and restart your computer. Check to see if the problem persists regarding Ubisoft to log in properly.
Solution 7: Use SFC to Scan for Missing or Corrupt System Files
Networking issues can often by system-related. These problems are rooted deep inside the system files and the only way to try to resolve them is by running the System File Checker (SFC). It will scan your system files for errors and possible repair or replace them. Follow the steps below to do so!
- Search for “Command Prompt” by typing it either right in the Start menu or by pressing the search button right next to it. Right-click the first entry which will pop up as a search result and select the “Run as administrator” context menu entry.
- Additionally, you can also use the Windows Logo Key + R key combination to bring up the Run dialog box. Type in “cmd” in the dialog box which appears and use the Ctrl + Shift + Enter key combination for admin Command Prompt.
- Type in the following commands in the window and make sure you press Enter after typing each one. Wait for the “Operation completed successfully” message as an indication that our message was successful.
sfc /scannow
- Try to restart your computer and check to see if the “A Ubisoft service is currently unavailable” error continues to appear on your computer.
Solution 8: Perform a Network Reset
Performing a Network Reset is yet another simple method of resolving this problem and it’s the last one in our list. It has worked for many users and you have absolutely nothing to use if you try it out. Follow the steps below and check to see if the “A Ubisoft service is currently unavailable” error continues to appear on your computer.
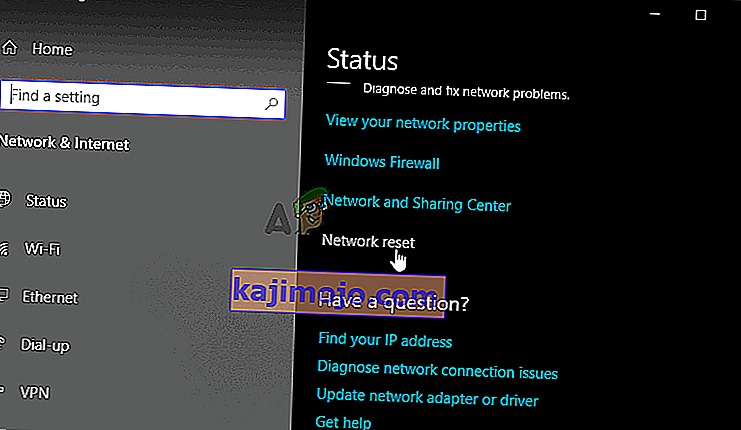
- Open the Run utility by using the Windows Key + R key combination on your keyboard (press these keys at the same time. Type “ms-settings:” in the newly opened box without the quotation marks and click OK to open the Settings tool.
- An alternative way would be to open the Settings tool on your PC by clicking the Start menu and clicking the cog icon at the bottom left part.

- Also, you can use the Windows key + I key combination for the same effect. Click to open the Network & Internet section and stay in the Status tab at the left side of the window.
- Scroll down until you reach the blue Network reset button. Click it and follow the instructions which will appear on-screen and make sure you comply with everything.
- Check to see if the same problem persists!

