Steam Cloud pakub lihtsat ja läbipaistvat viisi oma mängude andmete salvestamiseks kaugmälusüsteemi. Auto-Cloudi konfiguratsioonis määratud failid või kui need on kettale kirjutatud, kopeeritakse pärast mängu olemasolu automaatselt Steami pilveserveritesse (kasutades Cloud API-d).

See on eriti kasulik, kui kasutaja vahetab oma arvutit. Mängu edenemist jätkab kas Cloud API või see loeb otse kettalt. Failid laaditakse enne mängu käivitamist automaatselt alla, kuna oleksite juba oma Steami mandaadi sisestanud. Steam Cloudi peamine ülesanne on tagada kõigi failide sünkroonimine kõigis arvutites, mida kasutaja kasutab.
Kasutajatel on võimalus keelata kogu pilve sünkroonimine kliendi Steam-seadetes. Samuti saavad kasutajad paindlikult keelata pilve sünkroonimise mängu kohta. Kuid enne lahendustega edasi liikumist värskendage Steami klient uusimale versioonile.
Millised on aurupilve kasutamise erinevad meetodid?
Steam pakub Steam Cloudi kasutamiseks kahte erinevat meetodit.
Esimesena on Steam Cloudi API. Cloud API pakub rea funktsioone, mis võimaldavad teil Steam Cloudi otse oma mängu integreerida. Pilvepõhine API teeb ka ülesande isoleerida üksikud Steami kasutajafailid üksteisest ning tagab ka parema kontrolli Steam Cloudi kui terviku üle.
Teine on Steam Auto-Cloud. See funktsioon oli mõeldud peamiselt pärandmängude jaoks, kus Cloud API-d oli raske kasutada. See on kiire viis Steam Cloudiga alustamiseks, kuid sellel puudub Steam Cloudi API pakutav paindlikkus ja võimsus.
Arendajad soovitavad Steam Auto-Cloudi asemel kasutada Cloud API-d, kuna see pakub sügavamat ja tõhusamat integreerimist ja kohandamist. See võimaldab teil Steami pilvest maksimumi võtta.
Kuidas lahendada Steam Cloudi konflikt?
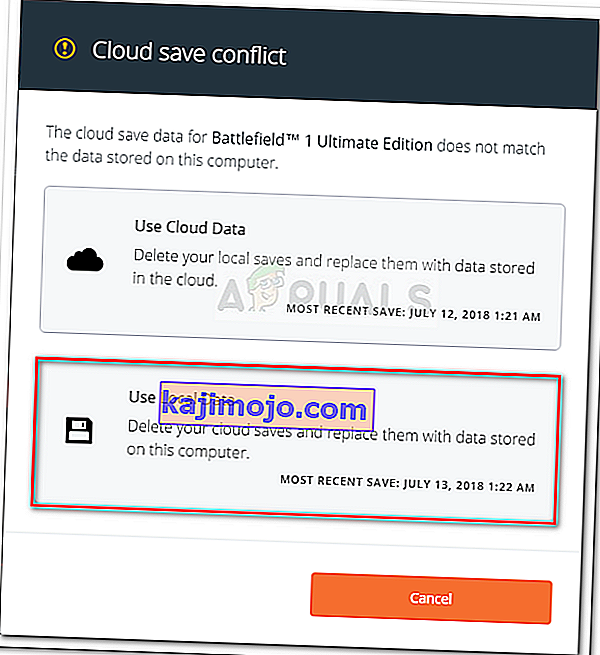
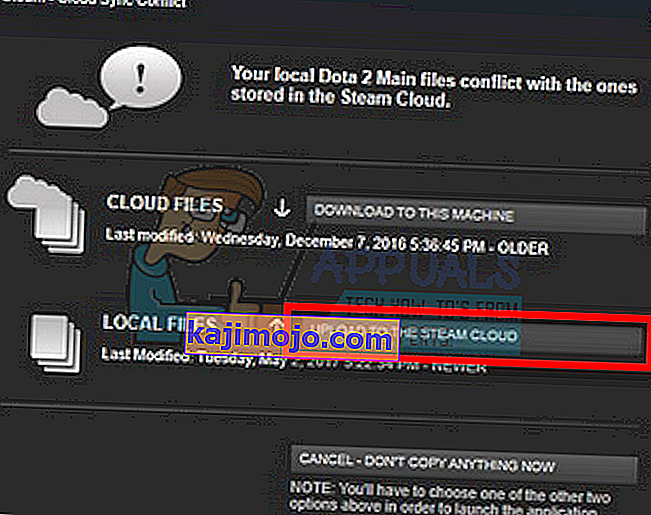
Steam Cloudi konflikt tekib siis, kui Steam Cloudi sisu ei ühti teie kõvakettale salvestatud kohalike mängude failidega. See võib juhtuda masinas, mida sel ajal kasutasite, või see võib juhtuda varem mõnes teises masinas. Kuna faili muudeti kahes erinevas kohas ilma nendevahelise sünkroonimiseta, ei suuda Steam kindlaks teha, millist faili säilitada.

Tõenäoliselt valite faili, mida viimati muudeti. See tähendab, et teie mängu uusimad arengud salvestatakse. Peaksite hoolikalt kontrollima aknas eelvaadatud andmeid. Vaadake konteksti kuupäev ja kellaaeg hoolikalt läbi ning vastake sellele, kui viimati Steamis mängu mängisite. See kontekst aitab teil valida, millist versiooni säilitada.
Pange tähele, et mängude mängimine võrguühenduseta režiimis hoiab teie mänge sünkroonimata ja see on Steam Cloudi konflikti kõige tõenäolisem põhjus.
Mis siis saab, kui Steam ei suuda faile pilvega sünkroonida?
See viga näitab, et Steam ei suutnud teie kohalikke faile Steam Cloudiga sünkroonida. See võib olla ajutine probleem, millega Steam Cloudi serverid võivad silmitsi olla. Steam Cloudi olekut saate kontrollida Steami veebisaidilt, et probleem oleks nende poolel.

Kui Steami pilveteenus töötab ja töötab ideaalselt, tähendab see, et probleem on teie otsas. Saate kontrollida oma Steami ühendust ja tõrkeotsingut. Samuti saate kontrollida, kas ainult teil on probleeme Steam Cloudiga sünkroonimisega.
Kui ignoreerite sõnumit ja klõpsate nupul „Mängi mängu”, võib see põhjustada võimaliku konflikti teie kohalike failide ja Steam Cloudi vahel. See võib põhjustada ka edusammude ja mängude andmete kaotamise.
Mis siis, kui pärast teise arvutisse kolimist kaotan faili või teen edusamme?
Kui teil on puudu viimastest edusammudest ja olete seadete abil kontrollinud, kas mäng kasutab Steam Cloudi, tähendab see, et kas Steam ei suutnud teie andmeid edukalt sünkroonida või sünkroonimise tulemusel laaditi teie varasemad andmed Pilv.
Võimalik, et teie algne fail või edenemine on endiselt vanemas masinas ja seda ei õnnestunud sünkroonida. See on võimalik, kui käivitate Steami selles arvutis, näitavad teie edusammud. Kui see juhtub, värskendatakse seda automaatselt kõigis teistes teie Steami kontoga ühendatud masinates.
Samuti ei kasuta paljud mängud Steam Cloudi võimalust. Kui Steam Cloudi tugi on saadaval, saate kontrollida mängu ametlikku lehte. Kui see pole nii ja teil pole juurdepääsu vanemale masinale, tähendab see, et teie edusammud on kadunud ja neid pole võimalik taastada.
Kuidas kustutada Steam Cloudi serveritesse salvestatud faile?
Steam Cloudi kasutatakse iga mängu edenemise varundamiseks, nii et te ei kaota oma edusamme, kui pääsete mängule juurde mis tahes muust arvutist. Järgmise meetodi abil saate kinnitada, et pilv salvestab teie edusammud.
Kontrollige, kas teie mängu varundatakse.
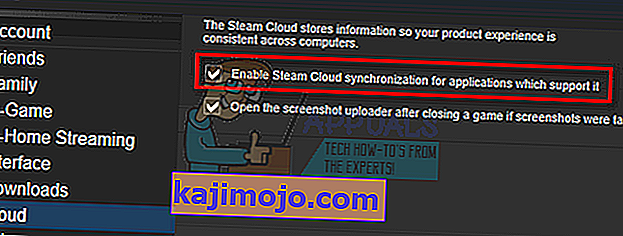
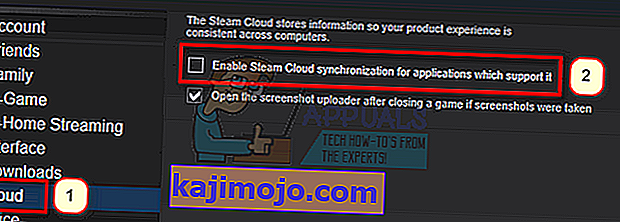
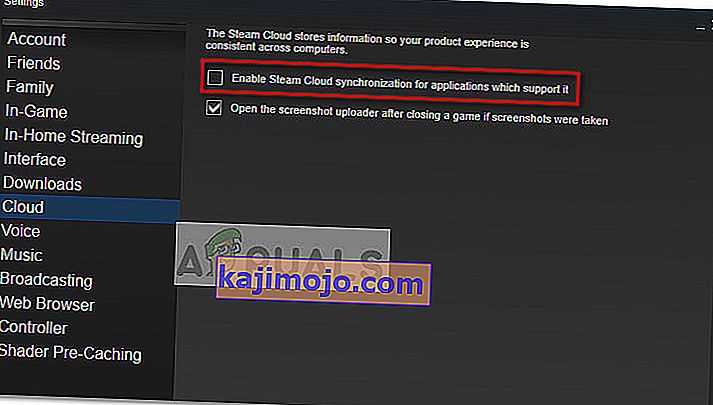
- Avage oma Steami klient . Avage selle sätted , vajutades akna vasakus ülanurgas asuvat nuppu Steam ja valides suvandi.
- Avage ekraani vasakus servas olev vahekaart Pilv . Kontrollige, kas on märgitud valik „ Luba Steam Cloudi sünkroonimine seda toetavate rakenduste jaoks ”.
- Järgmine klõpsake vahekaardil Raamatukogu , mis asub Steami kliendi ülaservas. Siin on loetletud kõik teie mängud.
- Paremklõpsake mängul ja valige Atribuudid . Seejärel navigeerige akna ülaosas olevale vahekaardile Värskendused .
- Siin akna allosas näete valikut „ Luba Steam Cloudi sünkroonimine [mängu nimi] jaoks ”. Veenduge, et valik oleks märgitud .


Kui teil on mõlemad valikud lubatud, tähendab see, et teie mängu varundab Steam Cloud ja me võime ka andmed kustutada.
Mis on varundusmehhanism?
Esimene asi, mida peaksite teadma, on see, et salvestatud mängude andmetest on kolm versiooni
- Algne versioon on salvestatud AppData kausta ( D1 ).
- Pilveversioon on salvestatud asukohta Steam / userdata / SteamID / AppID ( D2 ).
- Steami pilveserverites ( D3 ) salvestatud pilveversioon .
Pange tähele märkmeid (D1, D2, D3), mida me kasutasime, kuna edaspidi viidame neile palju.
Mängu esmakordsel käivitamisel luuakse D1 automaatselt. Kui olete mängimise lõpetanud, värskendatakse mängu andmeid D1-s ja kopeeritakse automaatselt D2-sse. Pärast seda sünkroonitakse D2 D3-ga, laadides sellega üles kogu oma mängu sisu.
Kui alustate oma mängu esimest korda teisest arvutist, siis kui Steami serverites on D3, kuid arvutis ei tuvastata D2, laadib see andmed automaatselt alla ja kopeerib D3 D2-sse. Steam Cloud laadib puuduvad andmed automaatselt alla ka iga kord, kui Steami käivitate.
Lühidalt öeldes on meie jaoks kõige olulisemad andmed D2. Kui suudame sellega manipuleerida, võime kustutada andmed, mille soovite kustutada.
Märkus. Mõnes mängus puudub D1 ja nad salvestavad oma andmed otse D2-sse. Kuigi mõned mängud ei kasuta D2-d meediumina ja laadivad andmed pilve üles otse D1-st.
What Are the Userdata Contents?
In the directory Steam/userdata, you should have a folder corresponding to your SteamID (You check what your Steam ID is by reading our article on it). After you open it, there will folders made for each game that you play. They will be identified using their AppID (AppID can be easily checked by visiting the game in the Steam store and extracting it from the URL). In this game folder, you will find two entities.
- remotecache.vdf: This file describes all the properties of files that are contained in the remote folder.
- Remotefolder. This contains all the files which are synced with your Steam Cloud server.
Deleting Data from Cloud
In this method, we will be following two important steps. We will first bring up the Steam Cloud conflict notification and then delete the Cloud files.
Do note that you would have to follow these steps game by game to delete all of the Steam cloud content.
First, we need to delete the AppID folder from your Steam directory. After you restart your computer and Steam, Steam will automatically re-create the folder. We need to perform this step to ensure that the Steam Cloud is working perfectly and we can go ahead with the part of deletion.
- Open your Steam directory. The default location for your Steam installation is
C:\Program Files (x86)\Steam
- Search for a folder of AppID and Delete it. Then restart your computer and Steam. Start a game for a few minutes. Make sure that you have a working internet connection.
- Navigate back to the Steam directory and check if the AppID folder is back. If it is, it is confirmed that your Steam Cloud is working perfectly and we can proceed with the method.
Bringing Up Steam Cloud Conflict Dialogue
The first part of the solution is probably the most difficult. To delete all your Steam Cloud data, it is necessary to bring the conflict dialogue. Without it is not possible to delete the data present in your Cloud. Steam Cloud conflict occurs when the Cloud files differ from the data present on your hard drive.
There are two methods to bring about this conflict:
Method 1:
- Make sure that your Steam Cloud is enabled by following the steps mentioned above. Exit Steam completely by ending all the processes starting with Steamclientbootstrapper using the task manager.
- Now will alter all the files in the location
Steam\userdata\SteamID\AppID\remote
The objective is to make sure that all the files are different from those uploaded to the Steam cloud. We can’t simply delete the files from this location as Steam will automatically notice that the files are missing and download the same ones from the Cloud servers. We can achieve our task by corrupting them and making them 0-byte files.
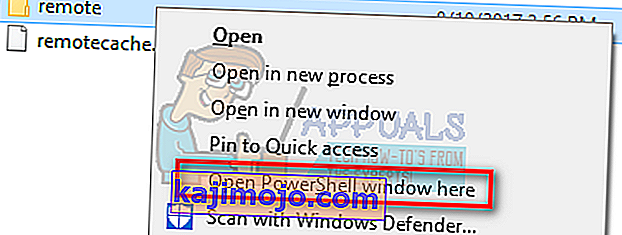
- Navigate to
Steam\userdata\SteamID\AppID\remote
- Now hold shift and right-click on your remote folder. Select the option “Open PowerShell window here”.
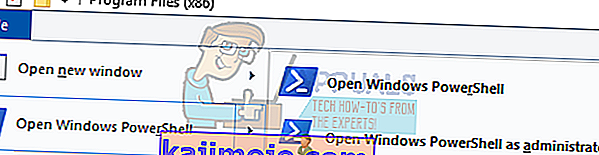
- You can also open PowerShell when in the folder by clicking the File option present at the top left side of the screen and selecting “Open Windows PowerShell as administrator”.
- Once PowerShell is opened, type the exact text written below


clc –path “C:\Program Files (x86)\Steam\userdata\SteamID\AppID\remote\*"
If you fail to write the correct code, you will get an error like this

If you correctly type in the line there will be no confirmatory message and you will get a window like this.

Start your Steam and there will be the conflict windows present on your Steam client.
Method 2:
This is an easier method as compared to the earlier one but it isn’t that efficient.
- Open your Steam client. Open its Settings by pressing the Steam button present at the top left corner of the window and selecting the option.
- Open the Cloud tab present on the left side of the screen. Uncheck the option “Enable Steam Cloud synchronization for the applications which support it”.

- Now navigate to your Stream directory as you did earlier and delete all files present in the folder of AppID. The file path for deletion is
Steam\userdata\SteamID\AppID.
- Now start the game to make new and different files in the file location.
- Exit the game and Steam completely by ending all Steam processes in the task manager (end steamclientbootstrapper first).
- Now delete the remotecache.vdf file present in the location
Steam\userdata\SteamID\AppID
- Start your Steam.
- Head over to the client’s Settings and enable the cloud.

Now a Steam conflict dialogue will come forth and we can proceed with the remaining method.
Deleting Cloud files
Once the Cloud conflict error is forth, don’t click any option and follow the instructions below.
- Navigate to the following file path
Steam\userdata\SteamID\AppID
and delete all the files in it. There will be two files (remote folder and remotecache.vdf). Delete both of them.

- Now go back to the conflict window and select the option of “Upload to the Steam Cloud”. Now Steam will sync your AppID folder while there will be nothing in it and the previous data on your Steam Cloud will be deleted.
- Now the game will start automatically but it will create new files that will be synced to your Steam cloud when you close it. We can prevent it from happening by pressing alt + tab. This will open the open windows on your screen. Select the Steam client from the list of windows.
- Once you are in the Steam client, open the client’s Settings. Navigate to the Cloud tab and uncheck the line which enables cloud.
- Now return to the game and exit. No files will be synced to your Steam cloud.
- Exit Steam and delete the AppID folder as we did before.


How to Make Sure If it Worked?
Remember how we checked at the beginning of this method if the Steam Cloud was running as expected by deleting the AppID folder and checking if it was made again. If there is no file present in the Steam cloud, there will be no file downloaded to your computer.
- Enable the Steam cloud as we did in the guide.
- Exit Steam completely by using the task manager.
- Delete the AppID folder (if you didn’t in step 2).
- Now check D3 (these are the cloud files) and compare them with D2 (local files on your computer). If there is nothing in D3, there will be nothing in D2 too!
- Check the following directory Steam\userdata\SteamID
No new AppID folder would have been created.
You can also check by logging Steam in on another computer and checking if the files exist.
If you make it till here without any problems, you have successfully deleted all the files on your Steam Cloud.
How to Delete Steam Cloud Saves from OS X
The procedures above can also be replicated on OS X and older Macs to a slight extent. By following the steps below, you will be able to delete your local saves. You can then disable the Steam Cloud synchronization from the Steam application, start a new game and create a few new saves. Then, when you return to re-enable the Steam Cloud synchronization features, the client will ask you which saves do you want to use. You can then choose the new ones which will delete and replace your old saves from the cloud.
To make things even clearer, here’s a step-by-step guide through the whole thing:
- Open your Steam application and go to Steam > Settings via the ribbon at the top of the window.
- In the settings menu, click on the Cloud tab and uncheck the box associated with Enable Steam Cloud synchronization for applications that support it.
- Close Steam completely and open your Finder app.
- Go to Library > Application Support > Steam > SteamApps > Common and open the folder of whichever game you want to delete the save files.
- Next, open the SAVE folder to reveal the saves of the game.
Note: If the location specified above doesn’t land you to the save files, try the following locations but mind the placeholders:
Users / *Your username* /Library / Application Support / *Game Folder* / Game Documents / *Game* / GameSaves Users/ *Your username* / Library / Application Support / Steam / userdata / *GameNumber* / remote Users/ *Your username* / Library / Containers / *Game Folder* / Data /Library / Application Support / *Game* / GameDocuments / *Game* / gamesaves
- Once you manage to identify and delete the local saves from the game you’re targeting, open the Game and create a few new saves.
- Exit the game, open steam and return to Steam > Settings > Cloud. From the cloud tab, re-enable the checkbox next to Enable Steam Cloud synchronization for applications which support it and click the OK button below.
- Steam will ask you whether you want to use the newly created local saves or the ones that you already have on the cloud. Choosing to use the new ones will delete the old saves that you currently have on Steam Cloud.