The Witcher 3: Wild Hunt on märulirollimäng, mille on välja andnud ja välja töötanud CD Projekt. See on jätkuv mängude sari, mis on digimaailmas jätnud üsna jalajälje.

Vaatamata mängu populaarsusele puutusime kokku konkreetse probleemiga, kus mäng kukkus mängu või kinematograafia ajal kokku. Pärast mängu krahhi ei olnud ühtegi veateadet ja kasutaja suunati tagasi töölauale. See muutub pettumuseks, kuna veateadet pole üldse ja probleemi põhjus pole samuti kindlaks määratud.
Selles artiklis käsitleme kõiki selle probleemi ilmnemise põhjuseid ja probleemi lahendamiseks vajalikke lahendusi.
Mis põhjustab Witcher 3 krahhi?
Pärast kõigi kasutajaaruannete analüüsimist ja arvutis katsetamist jõudsime järeldusele, et probleem ilmnes mitmel erineval põhjusel, alates tarkvaraprobleemidest kuni riistvaraprobleemideni. Mõned selle probleemi ilmnemise põhjused on järgmised:
- Videokaardi / riistvara ülekuumenemine: see on ilmselt üks populaarsemaid põhjusi, millega kokku puutusime. Kui teie videokaart või mõni muu riistvara ülekuumeneb, kukub arvuti probleemi lahendamiseks mängu kokku.
- Vigane / mittetäielik install: kui teie install on kuidagi rikutud või kui selle failid puuduvad, võib teil tekkida järsk krahh. Mängude failide kontrollimine võib probleemi lahendada.
- NVIDIA voogedastusteenus: kuigi graafikahiiglase pakutav voogedastusteenus on omamoodi tööriist, põhjustab see teadaolevalt mänguga konflikte isegi siis, kui te seda ei kasuta, ja põhjustab selle krahhi.
- Modifikatsioonid: Modifikatsioonid muudavad Witcher 3-s mängimise lõbusamaks, kuid nagu iga modi kõik puudused, pole see ka erand. Kui mod on mingil hetkel teie mänguga vastuolus, kukub see kokku.
- Steam Cloud Saves: Steam Cloud Saves on funktsioon, mille Steam pakub teie mängude salvestamiseks liikvel olles. See teenus salvestab teie faili perioodiliselt; just see tegevus põhjustab teadaolevalt konflikte Witcher 3-ga ja põhjustab selle krahhi.
- Ülikiirendamine: kiirendamine on tööriist, mis aitab teie arvutist mahla suurendada. Kuid see on teadaolevalt ka süsteemi ebastabiilne ja põhjustab selle krahhi ilma nähtava põhjuseta. Toimingu keelamine lahendab tavaliselt probleemi.
- Rikutud graafikakaardi draiverid: graafikakaart on arvutis mängu mängimisel peamine liikumapanev jõud. Kui selle draiverid pole mingil viisil riistvaraga sünkroonis, võib teie mäng selle vahel kokku kukkuda.
- GOG Galaxy ülekate: GOG Galaxy on mängude kogumise platvorm nagu Steam ja selle ülekate tekitab teadaolevalt probleeme Witcher 3-ga. Ülekatte keelamine töötab siin.
- GPU pistikud: GPU on teie peamise emaplaadiga ühendatud erinevate pistikute kaudu. Need pistikud, kui need on lahti, ei pruugi teavet õigesti edastada ja võivad seetõttu mängu toimimises probleeme tekitada.
- Kõrged graafikaseaded: kui teil on väga kõrged graafikaseaded, kuid teil pole nende haldamiseks õiget arvutit, kogete mitmeid probleeme ja mäng võib külmuda / kokku kukkuda.
Enne kui lahendustega alustame, veenduge, et olete sisse logitud administraatorina, ja salvestage ka eelnevalt oma tööd, kuna taaskäivitame teie arvuti sageli.
Eeltingimus: süsteeminõuded
Enne kui lahendustega alustame, peaksite kõigepealt kontrollima, kas teie arvuti vastab isegi mängu süsteeminõuetele.
Wild Hunt'i minimaalsed süsteeminõuded
Protsessor : Intel CPU Core i5-2500K 3.3GHz / AMD CPU Phenom II X4 940 RAM : 6 GB OS : 64-bitine Windows 7 või 64-bit Windows 8 (8.1) Videokaart : Nvidia GPU GeForce GTX 660 / AMD GPU Radeon HD 7870 PIXEL SHADER : 5,0 VERTEX SHADER : 5,0 TASUTA KETASRUUMI : 40 GB Pühendatud videomälu : 1,5 GB
Metsiku jahi soovitatavad nõuded
Protsessor : Intel CPU Core i7 3770 3.4 GHz / AMD CPU AMD FX-8350 4 GHz RAM : 8 GB OS : 64-bitine Windows 7 või 64-bit Windows 8 (8.1) Videokaart : Nvidia GPU GeForce GTX 770 / AMD GPU Radeon R9 290 PIXEL SHADER : 5.0 VERTEX SHADER : 5.0 TASUTA KETASRUUM : 40 GB Pühendatud videomälu : 2 GB
Tuleb märkida, et mängu sujuvaks mängimiseks peaks teil olema vähemalt soovitatud süsteeminõuded.
1. lahendus: mängufailide terviklikkuse kontrollimine
Enne kui proovime tehnilisi tõrkeotsingu meetodeid, kontrollime kõigepealt, kas teil on kehtiv mängu install või mitte. Me kohtasime mitmeid juhtumeid, kus mängude failid olid kas rikutud või puudulike installidega. Kasutajad võivad seda probleemi kogeda, kui värskendusprotsess katkestatakse või mängifailid kaustade vahel teisaldatakse.
Selles lahenduses avame Steami ja kasutame sisseehitatud funktsiooni, et kontrollida mängude failide terviklikkust. Kui rakendus midagi leiab, asendatakse see.
Märkus. Kui kasutate mängu mängimiseks mõnda muud kirjastamistarkvara, peaksite selles ka samalaadsed toimingud tegema.
- Avage oma Steami rakendus ja klõpsake ülemisel ribal nuppu Mängud . Nüüd vali vasakust tulbast Witcher 3 , paremklõpsake seda ja valige Atribuudid .
- Kui olete omadustes, klõpsake kategoorias Kohalikud failid ja valige Mängufailide terviklikkuse kontroll .

- Oodake, kuni protsess on lõpule jõudnud. Pärast kontrollimise lõppu taaskäivitage arvuti ja käivitage uuesti Witcher 3. Kontrollige, kas krahhi probleem on lahendatud.
2. lahendus: Mängu prioriteedi muutmine
Protsessi või rakenduste prioriteet ütleb arvutile, kui oluline on see, kas ressursside jaotamisel tuleks teistele eelistada. Vaikimisi on kõigi rakenduste prioriteet normaalne, välja arvatud süsteemiprotsessid. Kui Witcher 3 ei saa piisavalt ressursse, jookseb see lõpmatuseni kokku. Selles lahenduses navigeerime ülesannete halduri juurde, otsime üles Witcher 3 protsessi ja muudame seejärel prioriteedi kõrgeks prioriteediks ning vaatame, kas see töötab meie jaoks.
- Käivitage Witcher 3 oma arvutis. Minna Desktop samas mäng ikka töötab, vajutage Windows + D . Vajutage Windows + R, tippige dialoogiboksi “ taskmgr ” ja vajutage sisestusklahvi.
- Nüüd klõpsake vahekaardil Üksikasjad , leidke kõik Mordhau kirjed ja kuna Witcher 3 peamine käivitaja on Steam ise, peate muutma ka selle prioriteeti.
- Paremklõpsake iga kirje peal, hõljutage kursorit seatud prioriteedi kohal ja määrake see kas väärtusele Tavaline või Kõrge .
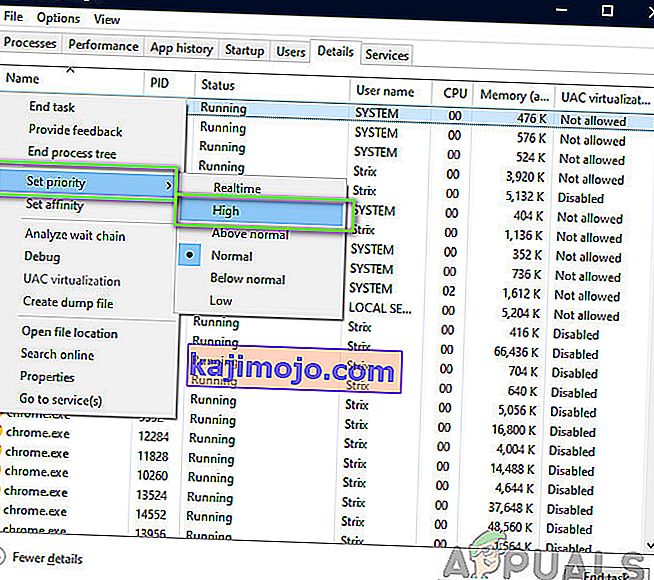
- Tehke seda kõigi oma kirjete jaoks. Nüüd Alt-tab oma mängu ja alustage mängimist. Pange tähele, kas see muutis krahhi probleemi.

3. lahendus: NVIDIA voogedastusteenuse keelamine
NVIDIA Streameri teenus on komplektis uusimate NVIDIA välja antud graafikakaartidega. See töötab teie arvutis kogu aeg taustateenusena ja tuleb mängu siis, kui voogesitate NVIDIA rakenduse abil. Nägime, et see teenus oli Wither 3-ga palju vastuolus ja põhjustas mitmeid probleeme, sealhulgas krahhi. Selles lahenduses navigeerime teie teenustesse ja keelame teenuse käsitsi.
- Vajutage Windows + R, tippige dialoogiboksi „services.msc“ ja vajutage sisestusklahvi.
- Teenustes olles otsige NVIDIA voogesituse teenuse kirjet . Kui olete selle leidnud, paremklõpsake seda ja valige Atribuudid .
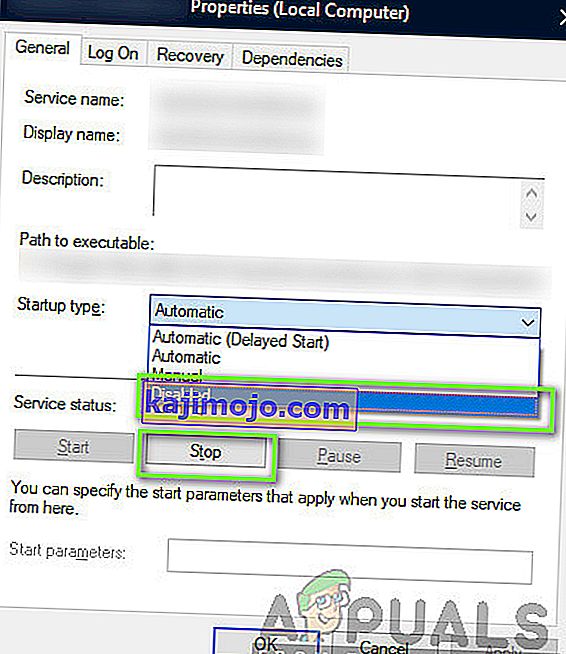
- Atribuutides olles klõpsake teenuse peatamiseks nuppu Peata ja valige käivitusviis Käsitsi . Salvestage muudatused ja väljuge.
- Now try launching Witcher 3 and see if the crashing issue is resolved.

Solution 4: Disabling Steam Cloud Saves
The Steam Cloud is a platform which allows games and users to save their progress and data over the Steam cloud so whenever a user logs into the client, the client automatically downloads and updates the progress and preferences. This is a pretty nifty feature which makes Steam more preferable to other engines but is also known to cause several issues.
In this solution, we will navigate to the Steam settings and turn the synchronization off.
- Launch Steam as an administrator and click on Library present at the top.
- Now, all the games will be located at your left-side panel. Locate Witcher 3, right-click on it and select Properties.
- Once in properties, click on the Updates tab and uncheck the option of Enable Steam Cloud Synchronization.

- Save changes and exit. Restart Steam and launch the game. Check if the issue still occurs.

Solution 5: Disabling VSync
Vsync (Vertical Sync) allows users to synchronize the frame rate of the game with the monitor refresh rate for better stability. This feature is embedded in Witcher 3 and is usually enabled by default. Even though this mechanism is quite nifty, it is known to cause issues with the gameplay and induce crashing.
In this solution, we will navigate to the settings of the game and disable the option.
- Launch Witcher 3 and click on Options from the main menu.
- Now, click on Video and then select Graphics.

- Once in Graphics options, click on VSync and turn the option off.
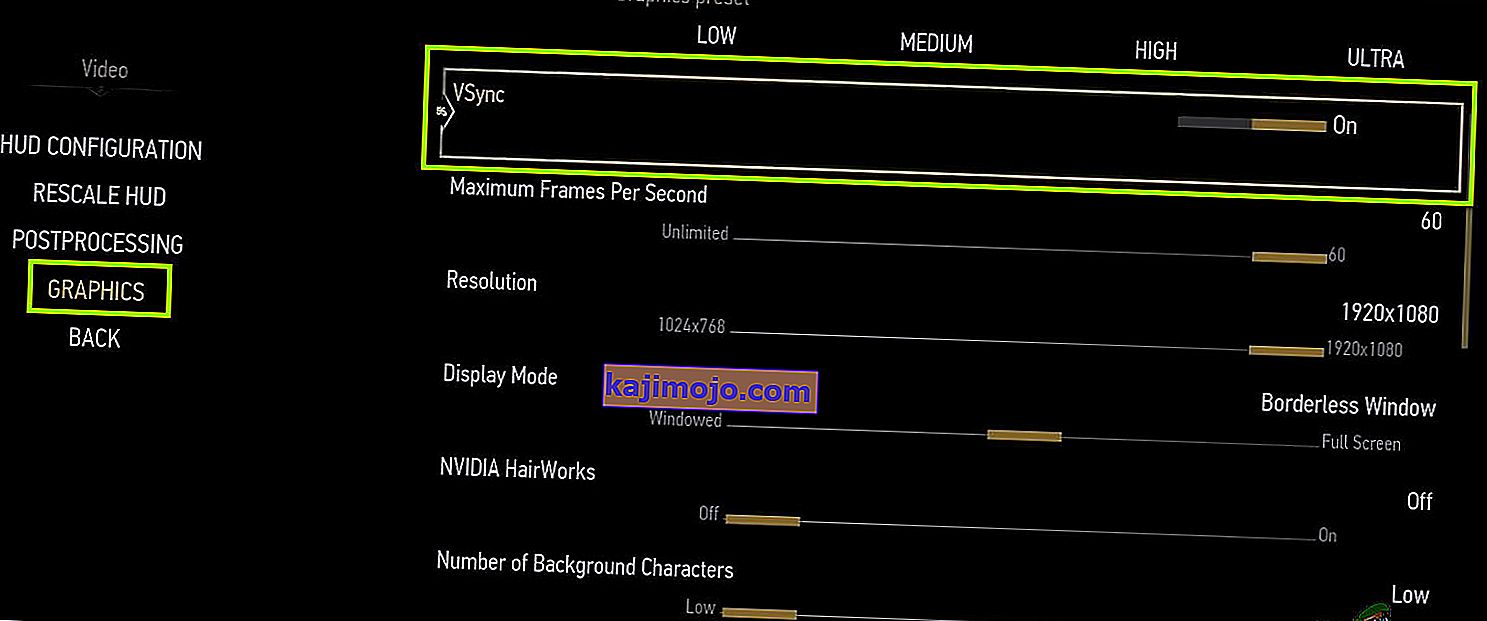


Note: You can also tweak other graphics settings from here if this doesn’t work.
- Save changes and exit. Restart Witcher 3 and see if the issue is resolved.
Solution 6: Disabling Frame Rate Cap
Witcher 3 also provides an in-game option which allows you to set the maximum frame rate. However, even though this allows you to manage your frame rate, it causes issues with the game. In this solution, we will navigate to graphics settings and remove the cap.
- Navigate to Graphics settings using Options in the main menu as we did in the last solution.
- Once in graphics, look for the option of Maximum Frames Per Second. Move the slider to unlimited.

- Restart the game and check if the issue is resolved for good.

Solution 7: Playing in Full Screen
Another thing to try before we jump into more technical methods is changing the game type to Fullscreen. It seems that the borderless window causes more load on the CPU as the Desktop is also running in the background. In this solution, we will navigate to Witcher 3 settings and tweak the changes.
- Navigate to Graphics Settings using Options from the main menu as we did earlier.
- Now, click on Display Mode and set the option to Fullscreen.
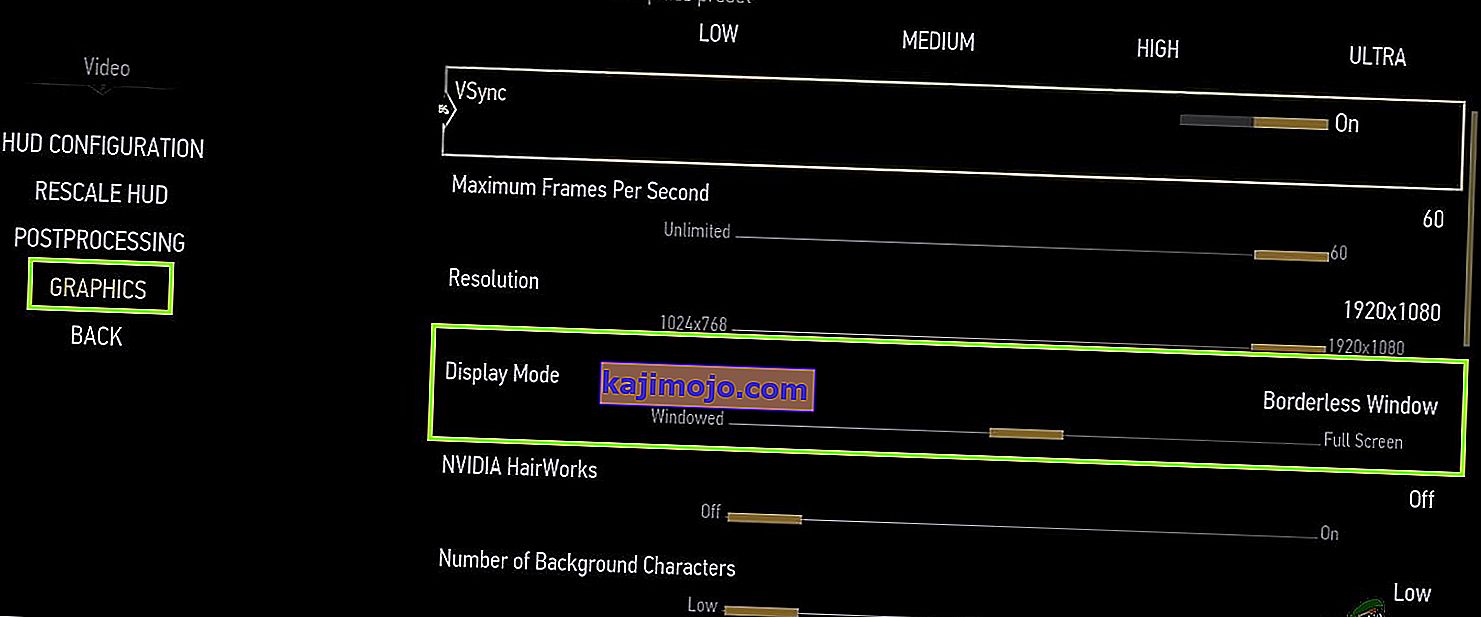
- Save changes and exit. Restart the game and check if the crashing issue is resolved.

Solution 8: Disabling Overclocking
All high-end PC builds nowadays have the option of Overclocking which can help in outputting more juice than what your specifications already have. Overclocking means running the graphics card/processor faster than its default clock speed. When this occurs, the hardware reaches its threshold temperature in a while. The computer detects this and reverts to the normal clock speed until the hardware cools off. When the hardware is cool enough again, the clock speed is increased again.

This act increases your computer’s performance a lot and helps if you don’t have a powerful computer with good processing/graphics capability. The thing to note here is that not all games support overclocking in their mechanisms. The same is the case with Witcher 3. Hence you should try disabling all overclocking on your computer and then try launching the game. If things go well, you will not experience the crashing anymore.
Solution 9: Disabling Mods
Mods are third-party plugins which are meant to enhance the experience of users by changing the graphics a little bit and adding more features than the stock game. This gives players a whole new level of customization to create a better and enjoyable gaming environment. However, since Mods are third-party, they are known to conflict with the game’s very engine and cause several issues.

Also, if the mod’s version and the game’s version are not in sync with each other, the game will crash whenever the mods try to change something in the game. Hence, in this solution, you should try disabling all types of mods on your computer and then see if the issue gets solved. Consider copy-pasting the mod content to another location until we complete the troubleshooting process. After removing the mods, restart your computer and check if the issue is resolved.
Solution 10: Checking for Overheating
Computers often get overheated when they used extensively or when they are performing heavy computations. Similar cases were seen to occur with Witcher 3. It seemed that whenever the computer overheated, the users were given no warning of any such and the game automatically crashed.

Here, you should check your components whether the cooling system is indeed working properly and dust isn’t blocking anything. You can also download temperature checking utilities and measure the temperature when the game is running. Make sure that no components (especially the graphics card) are overheating.
Solution 11: Checking Connectors:
Another thing to try is making sure that the connectors connecting the graphics card, RAM, etc. are properly connected with the hardware. This was a very common occurrence with various users. If the connection is not stable, the data will not be transmitted properly and hence, your game might crash.

You can even try placing the hardware on other connectors and see if this fixes the problem at hand. Press the hardware gently into the connectors to make sure.
Solution 12: Updating Graphics Drivers
If all the above methods don’t work, there is a possibility that you don’t have correct graphics drivers installed on your computer. Drivers are the main components which facilitate the interaction between the game and the hardware. If the drivers are outdated or corrupt, the game might not display correctly and cause lagging. In this solution, we will first remove the current drivers using DDU and then install fresh copies.
- Download and install DDU (Display driver uninstaller) from its official website.
- After installing Display Driver Uninstaller (DDU), launch your computer in safe mode. You can check our article on how to boot your computer into safe mode.
- After launching the DDU, select the first option “Clean and restart”. This will uninstall the current drivers completely from your computer.

- Now after the uninstallation, boot your computer normally without safe mode. Press Windows + R, type “devmgmt.msc” in the dialogue box and press Enter. Right-click on any space and select “Search for hardware changes”. The default drivers will be installed. Try launching the game and check if this solves the problem.
- In the majority of the cases, the default drivers will not work for you so you can either install the latest drivers through Windows update or navigate to your manufacturer’s website and download the latest ones.

- After you have installed the drivers, restart your computer and check if the problem is solved.
Note: Also consider uninstalling NVIDIA GeForce Experience from your computer. This is known to cause issues. Also, we saw several cases where rolling back the driver fixes the problem. Make sure that you try it.